Always Do This with These TWO Notes (SAVE A FRIEND!)

The worst guitar notes are often the ones that are most commonly used in non-musical situations like movie sound-tracks or playing weird (but sometimes effective) guitar exercises.

In this video, I’m going to show you two of the worst notes that when played produce some pretty terrible sound. They are played a distance of a 1/2 step apart creating a harsh dissonance, know musically as the Major 7th and Minor 2nd intervals.


This lesson will demonstrate the contrast of this sound and more importantly, how these harsh notes can blend within the layering of harmony to create a balanced effect out of their obvious harsh sound. 


WATCH THE VIDEO:


Today we are taking a trip to the note graveyard, with a look at two of the worst notes that a guitarist could play. 


And, this is going to be an interesting video for a lot of my viewers because for most guitar players the idea of combining notes to form intervals is a foreign subject, but it doesn’t have to be. 


The best way to learn them is through exposure to what they do, which is sadly missing from a lot of the current guitar instruction out there. 


Now, you’re probably wondering what are the two worst notes and why are they so bad. So, let me begin this by referencing an album that was released back in 1994 by legendary jazz guitarist, Pat Metheny.


This Pat Metheny album was a shock to his fans back when it was released. In fact, even if you are a Pat Metheny fan, you may not have ever heard of this album before. 


And, that would probably be because it was terrible and sounded nothing at all like anything Pat Metheny had produced before releasing it. 


Pat Metheny is a huge jazz icon of guitar and jazz music. He’s known for; amazing melody, interesting smooth jazz harmonies and lush beautiful music with his signature hollowbody jazz tone from his guitar. 


But, the album “Zero Tolerance for Silence.” Was a total shock to his fans. It was full of the worst note combinations (the two notes I’m going to talk about right here) are included in abundance. It was just an awful release. 


Now, the rumors say that Pat Metheny made it because he was upset with Geffen Records, and his contract was ending and this was his way of expressing how frustrated he was with them. 


Now, he later denied that after it came out, but many believe that it was the reason behind the album. Now, with all that out of the way, let’s zoom in on the neck and learn exactly what these notes are…


Interval 1):
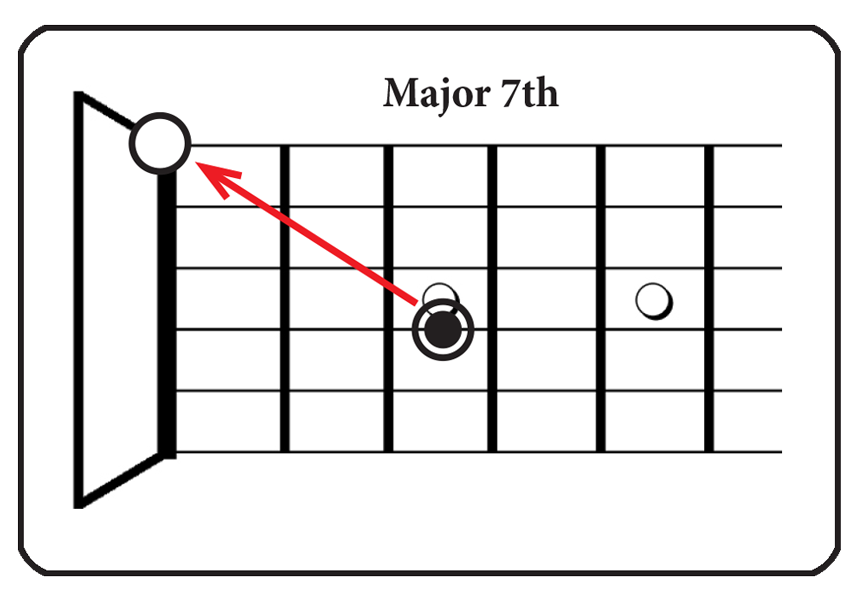
The “Major 7th” Interval: Here’s our first interval, it’s the “Major 7.” 

Here’s how it sounds…


 As you can tell, this interval is absolutely horrible on the human ear. It’s probably why trains include it as an interval for train horn blasts to keep us away and off the tracks! 


And, one of the most common chords played by those train horns is the Minor Major 7th. This chord is made up of minor tonality with the Major 7th interval used on top.


                         ____________________________________________________


I wanted to take a minute to let you know, that if you want to learn even more about scales and theory I have a great offer for you.

With any donation over $5, or any merchandise purchase from my Tee-Spring store, I’ll send you free copies of THREE of my most popular digital handouts.

One is called, “Harmonized Arpeggio Drills” (it’ll train you on developing your diatonic arpeggios).

Another one is my “Barre Chord” Handout which includes a page showing all the key signatures along with a chord progression that applies barre chords.

Plus, you’ll get my Notation Pack! It has 8 pages of important guitar worksheets for notating anything related to; music charts, guitar chord diagrams, and TAB.

As a BONUS, (from my "Over 40 and Still Can't Play a Scale" video), I'll also throw in a breakdown of all of the chords that are diatonic to the "F Major" scale.

As an EXTRA BONUS for my Phrygian Dominant video, I'll also throw in a breakdown featuring all of the chords that are diatonic to the Phrygian Dominant scale.

Just send me an email off of the contact page of CreativeGuitarStudio.com to let me know about either your donation or your Merchandise purchase and I’ll email you those digital handouts within 24 hrs.   

                       ____________________________________________________


Interval 2):
The “Minor 2nd” Interval: The inversion of our Major 7th interval is called “Minor 2nd” and it needs to also be addressed here as well. On the neck this interval looks like this… 


The experience of this Minor 2nd sound is often applied in jazz altered chord types, and one of the most popular of those chords is the “Dominant 7 (b9).” 


Now, this chord's sound is really unstable and it’s generally never a chord that you’ll hear functioning outside of jazz. Here’s how it sounds. 


In jazz, you’ll hear it harmonized to resolve chords from dissonant sounds to more consonant sounds, like perhaps the “A7(b9)” transitioning to a, “D Minor 7th.” 


You can also experiment with transitioning from the highly unstable sound of the "A7(b9)" over to a resolution that omits a 5th interval in its voicing. Like for example resolving to a "Dm7" chord with no "A." See the voicing below...


FINAL THOUGHTS:
Before we wrap up, I wanted to mention how (even when you have awful sounding notes) they can still become harmonized to provide some balance. 


One common example of this, is the Major 7th chord. Let’s have a quick look at the effect of using harmony to dull-down the ugly level of sound we get from horrible intervals.


The Major 7th Chord:
Starting out from a horrible sound doesn’t necessarily have to mean that we need to remain within a horrible sound. Take for instance a chord like the Major 7th. 


That ugly interval of the Major 7 is masked within this harmony to produce a very balanced sound.


The effect of using a Major 7 interval doesn’t have to be ugly, because the coming together of chord harmony can balance the sound out and allow for a more consonant effect. 


If we add a touch of dissonance prior to the Major 7, the balancing effect becomes even greater. Like for example if we performed a Dominant 7th chord just before we went ahead and played the Major 7, the chord balance would increase. 


If you go the extreme like Pat Metheny did you could make an entire album with these “Worst Two Notes,” I’ve covered here. Just be warned that you won’t get the best reviews upon your album release. 


Instead, my (more useful) suggestion would be to apply these bad sounds through integration as a way to find balance in your music using harmonized concepts like we discussed... 


Harmony is critical to taking a horrible sound and having it work “for you,” rather than against you. Although car horns and train horn blasts are one of the “useful” ways that we can apply these bad sounds in daily life outside of music... 


So, remember that integration is everything, as well as, the context within that we would apply these - two worst notes. 


___________________________________________________

GET GOOD NOW - JOIN THE MEMBERS AREA

Join Now

Guitar Chords | F Chord | Guitar Notes | G Chord | C Chord | D Chord | Guitar String Notes


The BEST Neck and Scale Exercise EVER!

Would you like to discover the best Guitar Neck and Scale exercise that will build maximum results for the mastery of scale phrasing? Not just that, you'll learn the best way to apply your melodic ideas on the guitar neck using this system as well. If you said yes, then check out this lesson on "Scale Sequencing."


Whether you are familiar with a few, or a lot of Guitar Neck and Scale exercises (or any variation thereof), you are going to want to watch this video till the very end. 


The idea of using Guitar Neck patterns for Scale sequences to reach the best overall musical performance is paramount to getting good at writing melody and for the art of learning how to play a guitar solo.  


If you need to understand the best Guitar Neck and Scales exercise, then this lesson carries a key message that you will not want to miss when it comes to answering this question truthfully and without relying on a bunch of ineffective simplistic guitar studies.


WATCH THE VIDEO:


Your knowledge of the neck, your awareness of scales, and your ability to have fast easy access to melody is going to take a big leap forward in this lesson. 


I promise that I’m going to make this worthwhile for you today. Because a lot of us are following very different types of neck and scale training exercises on guitar. 


And, I’m sure you’ve seen other videos and you have friends that play guitar who will say to do this exercise and that exercise, but the scale exercise I’m about to go over with you is seriously one of the best ones that will quickly lead you to both build dexterity along with helping you to play more melody at the same time.


If you watch the video for this lesson right till the end, I’ll demonstrate how this can all come together by improvising over an example progression that will apply this idea in a very effective way. So, let’s get things started, by introducing the framework of how this Neck and Scale exercise operates musically.


BASIC SCALE THEORY:
If we were to start with a scale, (and for our example I’ll use the scale of, “E Natural Minor”), so if we explore that scale’s individual Notes we get, “E, F#, G, A, B, C, and D. 


Playing that group of notes up and down will obviously sound pretty basic. But, if we were to re-organize the notes so that they were in a new order and sequence, (like for example if we established the notes going; “E – G, F# – A, G – B, A – C,” 


Doing this sequence concept will establish something that not only could function as a nice exercise, but it could also double as a pattern of notes that could be applied melodically as well. 


BASIC SEQUENCE PATTERN:
I’ll explain more about the melodic direction with all this in just a moment, (because that is the coolest part). But first, I want to show you how to play the sequence on the guitar that I just read out loud!


Example 1).
The “E Minor” Scale – Upper 3 strings sequence…


                         ____________________________________________________


I wanted to take a minute to let you know, that if you want to learn even more about scales and theory I have a great offer for you.

With any donation over $5, or any merchandise purchase from my Tee-Spring store, I’ll send you free copies of THREE of my most popular digital handouts.

One is called, “Harmonized Arpeggio Drills” (it’ll train you on developing your diatonic arpeggios).

Another one is my “Barre Chord” Handout which includes a page showing all the key signatures along with a chord progression that applies barre chords.

Plus, you’ll get my Notation Pack! It has 8 pages of important guitar worksheets for notating anything related to; music charts, guitar chord diagrams, and TAB.

As a BONUS, (from my "Over 40 and Still Can't Play a Scale" video), I'll also throw in a breakdown of all of the chords that are diatonic to the "F Major" scale.

As an EXTRA BONUS for my Phrygian Dominant video, I'll also throw in a breakdown featuring all of the chords that are diatonic to the Phrygian Dominant scale.

Just send me an email off of the contact page of CreativeGuitarStudio.com to let me know about either your donation or your Merchandise purchase and I’ll email you those digital handouts within 24 hrs.   

                       ____________________________________________________


POPULAR SEQUENCES:
The Pattern that we just learned and played is using what’s often called a “Diatonic 3rd’s” sequence. 


The above form of sequence pattern is just one of the many different types of sequences found in music. 


You need to understand that there are mainly two ways we can formulate a sequence of notes from a group of scale tones. And, they can be very unique as well as, individual to how you want them to operate.


You can think of this as either:


1).  Develop an exercise using a sequenced idea. 


2). Use sequences as melodic ideas in a song or in a guitar solo. 


Next, let's get into the idea of using sequences to create melody. This is where the fun starts, because you can take any sequence designed from a neck and scale exercise and shape it to form really cool melodic ideas…


Sequence Idea 1).
Descending 16th-note triplet sequence in “E Minor” to the final note of “E” 


When we develop a sequence from out of a scale, we can use the order of the notes and the resolution tone (the final note) as a springboard idea over to a new sequenced statement. To demonstrate this let me show you an extension I composed that works off of the sequence that I just had played for you a moment ago…


Sequence Idea 2).
Descending 16th-note triplet sequence in “E Minor” to the final note of “B” 


As you can tell, those two sequences are very well balanced and flow one over to the next very smoothly. Now, believe it - that creating these sequenced ideas is not only FUN, but it’s so easy to do that I’ve given this to my private students (who barely even know their scales on guitar), and they’ve invented some really cool phrases using this concept ! 


Next let’s move on to trying another sequencing idea…


Sequence Idea 3).
Ascending and descending 16th-note triplet Legato sequence in “E Minor” to the final note of “A.”


Resolution tones, dynamics, scale phrasing, guitar phrasing devices and different guitar techniques can all come together when (studying or composing) exercises and melodic ideas while using Scale Sequencing. Let’s look at one more idea - final idea before we wrap up…


Sequence Idea 4).
Ascending and descending 16th-note triplet DYNAMIC punch sequence in “E Minor” to the final note of “F#”


These, Dynamic picking accents will only generally work well on certain types of sequence set-ups. So, when you do discover a set-up, or you compose one (that works well to apply this idea), you’ll end up having a sequence that offers your listener a unique experience with the melody because the effect of each strong pick attack can really draw in the listener and make for a very interesting and a very dynamic musical sound throughout your songs, and your solos!


___________________________________________________

GET GOOD NOW - JOIN THE MEMBERS AREA

Join Now

Guitar Chords | F Chord | Guitar Notes | G Chord | C Chord | D Chord | Guitar String Notes

This is How I Learned to Play My BEST Guitar Solos (3 Levels)

If you want to get better at playing guitar solos and you want to do it fast, you are going to need to learn how to do a few things that are especially important to your success...


Playing a guitar solo isn't easy. In fact, it tends to be one of the areas that’s most difficult for people to be able to make sense of. Learning to solo is something that’s difficult to show students and students who are training at home also find that it’s difficult to comprehend how playing a solo actually works. 


WATCH THE VIDEO:


A SHIFT IN MIND-SET:
Guitar players absolutely need pre-learned licks and lines. These are guitar lines that get taken from a players favorite songs and guitar solos. These lines are very important because they will act as springboard ideas to help players invent new licks and new ways of playing melodic ideas along and across the fingerboard. 


The guitar soloist also needs to get a handle on how to use a couple of smaller size scale layouts in different areas of the neck. Most guitar players tend to learn large "in-position" scales, however, this approach is often confusing for them to understand how to apply those large shapes and how to make them can work effectively. This is why smaller scale shapes are the way to go in the beginning for minimizing scale confusion.


Finally, the guitar player needs to practice applying a melody in more than one fret-board area. Once a melody has been established, that melody needs to be reorganized elsewhere on the neck. The focus for the second "complimentary melody," needs to be on dynamics, rhythm, and resolution tones.


USING THIS INFORMATION:
How I learned this, and now when I teach soloing, I move through a system that’s based upon the idea in that there are three levels to learning to play guitar solos, and in this video, we’re going to cover all of them. 


NOTE: watch this lessons video right through till the end because I’ll apply all of the ideas into a simple guitar solo that you can learn to play at home! 


Let’s get started with learning our first level of soloing…


SOLOING - LEVEL 001:
Our first stage of soloing has to do with developing awareness for pre-learned licks and lines. Every guitar player who can play a solo easily has spent time developing pre-learned licks and guitar lines from their favorite players and songs. 


The biggest benefit coming out of this work is the higher level of awareness a student gets for the fingerboard. Once we have good fingerboard awareness, (as a soloist), we have places to go when we start to play those very first notes of the solo. 


To accomplish this skill one of my first teachers always stressed learning small scales in two separate areas of the neck (so that I could jump back and forth with two different soloing perspectives for better line building). 


Once you learn this simple trick, and you start to apply it, you’re going to quickly discover the edge it gives you for being able to solo easier with more melodic ideas.

Let’s have a closer look at how you can get started with this on the guitar.


Regional Scale Shape No. 1:
Build pre-awareness of the solo area using not one, but two fret-board regions:

We are going to use the key of “E Minor” and apply it across two regions of the neck with an upper-string group of mid-region notes. 

Here’s the first (of two shapes), that we’ll study. It uses notes that are located in the 4th and 5th positions of the neck.


As you can tell, there’s just enough notes here to play a few licks, but not enough to get you into trouble. What we want to avoid is having too many options across too many strings. This is important because, too many options and choices can often leave the soloist confused due to, "note choice overload."


Regional Scale Shape No. 2:
Next, let’s jump over to another region of the neck (the 9th and 10th positions), so that we can have another collection of notes from this same key…


This new collection of notes allows us to branch out to a new region plus gain access to new geometrical shapes across the strings. This will go a long way to help with building lines that relate extremely well to the ideas that we would have started to establish back in the previous region of the neck.


Coming up next, I’m going to go over how to create licks between the two regions and then I’ll demonstrate all of this stuff by playing a short solo between both fret-board areas. 

But first - here’s a really important message about a promotion I’ve got right now for all of my viewers here on YouTube…


                         ____________________________________________________

I wanted to take a minute to let you know, that if you want to learn even more about scales and theory I have a great offer for you.

With any donation over $5, or any merchandise purchase from my Tee-Spring store, I’ll send you free copies of THREE of my most popular digital handouts.

One is called, “Harmonized Arpeggio Drills” (it’ll train you on developing your diatonic arpeggios).

Another one is my “Barre Chord” Handout which includes a page showing all the key signatures along with a chord progression that applies barre chords.

Plus, you’ll get my Notation Pack! It has 8 pages of important guitar worksheets for notating anything related to; music charts, guitar chord diagrams, and TAB.

As a BONUS, (from my "Over 40 and Still Can't Play a Scale" video), I'll also throw in a breakdown of all of the chords that are diatonic to the "F Major" scale.

As an EXTRA BONUS for my Phrygian Dominant video, I'll also throw in a breakdown featuring all of the chords that are diatonic to the Phrygian Dominant scale.

Just send me an email off of the contact page of CreativeGuitarStudio.com to let me know about either your donation or your Merchandise purchase and I’ll email you those digital handouts within 24 hrs.   

                       ____________________________________________________


SOLOING - LEVEL 002:
Creating "starting lines," based off of pre-learned musical ideas.


Starting lines are extremely important because they help establish the initial direction of the guitar solo. Next, I'd like to have you study with me on how to play an example of a starting line. 


NOTE: The example below is based off of our lower region note layout from out of the key of “E Minor.”


If we expand upon the initial idea (shown above) by shifting over to the secondary fret-board area, and we maintain the same (or close to the same), rhythm plus if we also experiment with adding dynamics, plus we select new notes for our resolution of the lines, we are going start building some great ideas for a really solid guitar solos. 


Below an example of how this could work from off of the notes of our initial guitar lick, but re-organized in the second soloing position of the neck… 


SOLOING - LEVEL 003:
Creating "secondary lines," that are based off of our initial musical idea.


Our last soloing level will be based around making a return back to the initial fret-board area and we will create a new melodic line that’s based off of another pre-learned idea. Here’s an example lick that you can start with… 


Secondary melodic line: 


Finally, to wrap this up we’ll expand upon the secondary idea by shifting over to the other fret-board region with the secondary lick we just played. 


Just like with the first lick we played, we’ll use this lick and work at maintaining the same (or as close to the same), rhythm. 


Plus, remember that its important to be sure to experiment with dynamics as well as, selecting optional notes for the resolution of the line. Here’s an example of how this could work from off of the notes of our 2nd guitar lick. 


PUTTING IT ALL TOGETHER:
In wrapping up, I’m going to put this 3-level guitar solo strategy to the test by using the work we've done in these two fret-board regions to play an improvised solo. 


Remember, that the idea here; is to use limited notes but, play them across two separate fret-board areas. 


It’s a, “less is more,” strategy that’s based upon the differences in fingerboard geometrical patterns as well as, how we approach rhythm, and how we use dynamics! Check it out. 


Guitar Solo Example:


Once again, I’d love for you to get a copy of my Handout Collection eBook. As I said earlier, there’s a ton of great information in here and we’re adding more to it every month. The latest addition (Vol. 3) has a number of great ideas for soloing. 


There’s a position based note exercise, a Mixolydian scale section, and a really cool section on playing melodies with the Diminished scale. 


The handout collection eBook is available with any Donation over $5.00 or with any purchase made over at the Creative Guitar Studio Teespring store


Visit Creative Guitar Studio.com/Donations to help support the project. OR, check out our Teespring Products in the Console underneath our YouTube videos. 


___________________________________________________

GET GOOD NOW - JOIN THE MEMBERS AREA

Join Now

Guitar Chords | F Chord | Guitar Notes | G Chord | C Chord | D Chord | Guitar String Notes