Posted by Andrew Wasson
Wednesday, January 29, 2020
Knowing when to change your workout so that it includes new chords (that you 'do not know'), can be largely based upon the styles of music that you enjoy learning. Folk, Jazz, Country and Pop guitar players will often know more chords than Blues, Rock or Metal players. If this sounds like you - then it's probably time for a change...
Adding a larger array of chords to your practice routine is one of the most important things that you can do to get more harmonic variety when it comes to your musical training.
Changing from playing in just one music style is another way, (a way that too often is ignored - leaving you to sacrifice your ability to build the necessary foundation required for establishing a solid musical base on the instrument).
Not adding change into your guitar playing and into your practice sessions won't provide you with enough stimulus for your fingerboard knowledge to be able to expand. In this video, I’m going to help you to realize that it is time to change your chord workout to include major and minor triad studies. WATCH THE VIDEO:
IT'S TIME FOR A CHANGE: In this session we're going to talk about change. And, change specifically with how you’re thinking about chords. For most guitar players “chord knowledge” can be very limited and often only functional at the head-stock area. Open and first position chords are some of the only patterns that a lot of guitarists will know. But, for other guitar players, chord knowledge can be far worse.
In fact, a lot of rock and metal guitar players will have very limited chord knowledge, (because so much of those styles are based upon riffs, rather than chord pattern strumming). So, in this lesson we’re going to explore learning how to understand one of the best ways that major and minor triad chords can operate all around the neck, in easy to play shapes. These shapes are going to be great to learn because they can cover a lot of ground no matter what style of music you like to play... So, let me perform a demonstration for you right now, to show you exactly how these triad chord shapes can be applied into a practice routine… Chord Exercise Demonstration:
Now that you have an understanding for how this exercise functions as a routine, the next thing to do, is to break it all down in stages and learn more about it in a step by step approach. I want you to learn all of the notes and also start getting a better grasp of the way these shapes can be applied. So, let’s get organized on the how to study this entire routine right now…
MAJOR ROUTINE: These triads are based within "E" Major. Learn the shapes and practice playing them as a sequence smoothly in time...
MINOR ROUTINE: These triads are based within "E" Minor. Learn the shapes and practice playing them as a sequence smoothly in time...
CONCLUSION: If you spend the time studying this triad chord exercise, it will help you on many different levels. First of all, these triad chord patterns are found within larger movable chords. Plus, this chord pattern drill can be placed onto other regions (off of other root notes), quite easily. Further, once you work out where the root notes are, and you become familiar with how these chords relate to their larger chord pattern counter-parts, you’ll find yourself reaching a whole new playing level for how to use these popular triad chords on guitar.
Are you feeling like scales are a confusing guitar topic in your study of guitar? If you are feeling this way, then that's perfectly fine. Feeling like this is extremely common, especially if scales are new to you and you've never worked on them before. In this lesson, I’m going to show you a "4 step" scale practice approach that you can start to do as soon as tonight...
This 4 step scale exercise will work wonders to help you loosen up to learning scales and it will increase your flexibility for applying scales both technically and musically. Much of what you are trying to overcome with scale practice relates to how a scale is perceived, where the roots operate on the neck and how to develop the scale up to a high level of skill. WATCH THE VIDEO:
SCALE STUDY EXERCISE: Each of the scale study steps in this exercise are going to help you hit these key scale learning areas and allow you to do it quickly so as not to take up much practice time. I want to show you a four step scale exercise that you can start doing tonight that will help you better understand (not just how you can start to place the scales on the neck), but also how to get better at their patterns - memorizing them - as well as, playing the major and minor colors as well. The ideas that I have for you are all based upon; the location of the scales root, determining major or minor, using the “5-fret” theory (to place the notes onto the guitar neck), and also to practice the scale using a three location system for helping you maximize the scale’s use. Let’s start by checking out how the entire exercise works once you’ve got it all together. PLAY THROUGH:
LEARNING THE EXERCISE: Now that you have a better idea of how this exercise operates. The next thing I’d like to do, is break everything down into steps, so that you can understand how to start learning each part of the exercise. First, we’ll break down how to begin locating scale root notes. 1). Scale Root (Tonic) Note Relationships: Octave distance Head-stock to Body "7-Fret" span. 6th string to 5th string (mid-neck region)
Octave distance Body to Head-stock "5-Fret" span. 6th string to 5th string (upper-neck region)
Octave distance Body to Head-stock "5-Fret" span. 5th string to 4th string (mid-neck region)
Next, we will establish how to understand the Major or Minor color of a scale. Otherwise known of as the scales "Tonality."
2). Establishing Major and Minor Color (Tonality): MAJOR TONALITY: Major relationships are established using a distance of a "Major 3rd" off of the scales Root (Tonic) note. This distance forms a unique geometrical pattern on the neck
MINOR TONALITY: Minor relationships are established using a
distance of a "Minor 3rd" off of the scales Root (Tonic) note. This
distance forms a unique geometrical pattern on the neck
Next, we will apply the 5-fret location system to establish the key-note (Tonic) locations.
3). Mapping the Tonic Location with the 5-Fret System: When starting this exercise, begin by choosing a note on the fret-board based upon the 6th string.
NOTE: If the first tone is lower down the fingerboard on the neck, (such
as the "G" note shown above off of the 6th string 3rd fret), the next note - the 5th-string tone - will be located 7
frets higher.
Map out the next tone based upon the 5th guitar string.
NOTE: If the tone is higher up the fingerboard on the neck, (such
as the "G" note shown above on the 5th string 10th fret), the next 4th-string tone will be located 5
frets lower. Map out the final tone based upon the 4th string.
4). Performing scales that operate within patterns: Major Pattern:
Minor Pattern:
EXERCISE OVERVIEW: Doing the exercise will get you more familiar with what creates a major scale and how to change the scale over to minor tonality.
After that, the routine practice of it will get you trained on how to use the 5-fret scale location system as you work with more tones on the neck. REVIEW: The 4-Step Exercise: 1). Locating Root Notes (Tonic) 2). How to establish Major and Minor color 3). Learning the “5 fret location system” 4). Perfecting the patterns on the neck
(in 3 locations)
CONCLUSION: If you can’t play scales right now, one of the most important things to start working on is understanding how the root notes for scales (that you want to play) can be located anywhere on the fingerboard. Once you understand that principle, you can organize the notes of a scale so that you can achieve the correct name of the scale that you want.
In other words, if you need an, “F Major” scale, you’ll need to know where those “F” notes are in order to get everything started. Once you have the desired naming note established, then the next thing to be clear about is the quality of the scale.
Major and Minor scales are the main scale qualities. So, you will need to get to know what happens to achieve each one. From that point, you’ll need to spend a considerable amount of time playing the patterns.
The practice that you put into practicing scale performance will build your skill with left and right and coordination, and it will help you to eventually start using the scales musically.
Posted by Andrew Wasson
Wednesday, January 22, 2020
How is your "Scale organization?" For a lot of guitar students, it can be quite difficult to know how to map out the scale shapes, unless of course you have a good initial practice plan.
In the lesson, I'll share a three octave "scale organizer" workout for mapping out scales on the neck. It's so straight-forward that you'll be able to apply the exercise in about 1 min. once you know it...
Scale organizing is best done when it is established across three root to octave zones on the fingerboard.
In this lesson, we'll take a "G" Minor scale phrase and ascend with it. Then we'll descend using the relative major, (Bb Major). The scale patterns will be very basic and easy to learn. We'll map everything (TAB is provided below). The simplicity behind this approach is based on remaining very uniform when ascending and descending, (which will eventually add to its ease of application). WATCH THE VIDEO:
GETTING STARTED: We'll begin with a scale Idea that you can take in and start using right away.
The concept of this exercise is really about scale organization into layers. In fact, one of my old teachers used to call this scale sandwiches. I suppose due to the fact that this exercise layers scale ideas like the layers of a sandwich. However you look at it, this idea is all about breaking the scale into multiple layouts. A small scale idea for ascending up the scale tones across 3 layers, and then another small scale idea for descending in 3 layers. What you’ll love about the exercise is that it’s very basic. And, once you learn how to do it, you’ll only need around a minute to play the idea all across the neck. It’s that easy... So, let me perform a demonstration for you right now, to show you exactly how it all works… THE EXERCISE RUN:
EXERCISE DEVELOPMENT: Now that you have an understanding for how this exercise functions. The next thing to do, is break it down in stages and learn more about it in a step by step way, (so that you comprehend all of the notes and you begin getting a good grasp of the intervals). By learning each part, (slowly in stages), you’ll be better with knowing how to pull the whole drill together. After that, you’ll need to get it committed to memory, (along with modifying it so that it can function in different keys and scales). Let’s start organizing this exercise in more detail for you right now…
Stage One: Ascending Scale Segment...
Stage Two: Descending Scale Run...
CONCLUSION: If you spend time studying this scale exercise, it will help with not only learning how segments of a scale can be placed across several other areas of the neck in the same way. But it will also help you become more aware of the scale intervals as you move the pattern that you create over to other keys. These scale pattern drills can be placed into other regions quite easily, and once you work this out with a few scale phrases (both ascending, and in reverse descending), you’ll get very familiar with how to set up new drills like this one.
The set-up is so simple, you can do it every couple of days with a new pattern. It’s excellent work!
If you want to build the highest level of skill for the notes on the neck, as well as, for chords, then I’m going to ask you to include this one "CAGED Theory" exercise into your daily training over the next month....
All you’ll need is a couple of days to get started with learning the basic structure of the exercise, and then about 27 days more to develop proper technique to build the muscle response for performing all of the chords everywhere across the neck. In this lesson, I am going to show you how this one CAGED exercise will not only help you increase your skill for locating notes on the neck, but I’m going to also stress what its potential is for your rhythm guitar ability. The value of the results that you can get from adding this exercise to your training over the next 30 days will be staggering. WATCH THE VIDEO:
Today we’re talking about an exercise applied around the CAGED theory. If you’re not familiar with what the "CAGED Theory" is, then you may to want to start by watching my video titled, “GUITAR THEORY: The "CAGED" System.” If you are familiar with what the CAGED Theory is, then this exercise routine that I have for you here will be fantastic. This exercise has a goal of learning the following:
Octave patterns on the fingerboard
Understanding note locations on the neck
Learning to understand positions and Range
Popular patterns of moveable major and minor triad chords
If you study this exercise for at least a month, (30 days), you’ll develop your moveable major and minor chords to an extremely high level of skill. Plus, your knowledge of how the notes on the neck operate will also become a lot better. To get things started, I want to run down a demonstration of this entire exercise, so that you fully comprehend how it works once it gets developed. Full Exercise:
Now that you understand how this exercise operates. The next thing I want to do, is break everything down in steps so that you’re fully aware of how to start learning each part of the study.
EXERCISE - STAGE 1: Developing Octaves, (study the following "C" note octave patterns all across the neck).
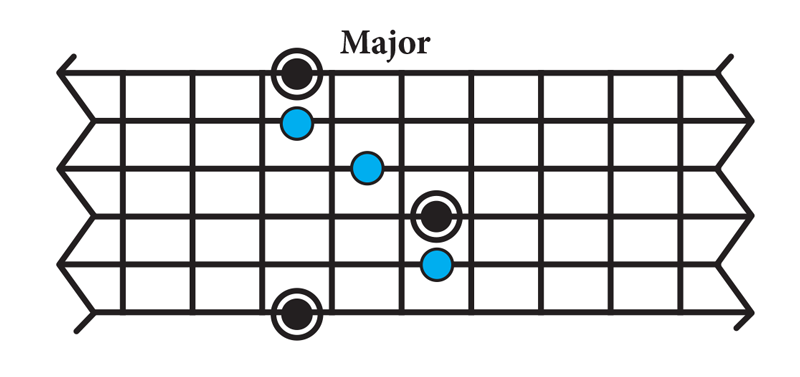
EXERCISE - STAGE 2: Developing Chord Patterns, (study the following chord patterns all across the neck). Note: The circled dots are the root notes, and the blue dots are the chord tones. Be mindful of the location change when the chord pattern switches from major to minor. 5th string to 2nd string...
4th string to 2nd string...
6th string to 4th to 1st string (2-octave)...
6th string to 3rd to 1st string (2-octave)...
5th string to 3rd...
NOTE: Begin by learning how to fret each chord pattern (Major and Minor). Then, study how they link together across the fingerboard. Use one root tone at a time when linking the patterns to stay connected to the same naming note.
YOUR 30 DAY GOAL: Your initial longer term goal for this study will be to learn how to get the octave elements of this exercise committed to memory. Then, you'll need to develop the chord patterns up to a level of memorization. The second step to developing this exercise is to learn how to make modifications to the root (naming note). You'll need to become clear on how to move the root over to other notes so that you’ll understand how to apply it across all of the other musical keys on the neck.
CONCLUSION: If you spend the time studying this CAGED Theory (note and chord drill) it will establish itself as something incredibly helpful when it comes to getting you to think about your octaves and your triad chords as well as, how those notes and chords sit anyplace along the neck. Also, doing this work will go a long way toward helping you think about the best chord to play when you’re working as a rhythm guitarist. All too often, when we’re playing rhythm guitar, we come across chord changes in songs that can have us feeling unsure of which chord would work the best, or what chords sound the best. This exercise will give you a lot more options when it comes to playing the best chords possible. You’ll find yourself coming up with all kinds of different chords much faster and you’ll be able to use any chord across the fret-board much better!