Play This for 2 Minutes & See Why Guitarists Get Addicted

If you want to develop arpeggio based harmony for all of the diatonic keys, you may think that you're going to have to spend hours and hours a day trying to get it all down. Luckily that is not the case at all...


If you are able to commit to a consistent but short effort, (as little as 2 minuets), learning the keys, along with a few arpeggio shapes on the neck, you will be amazed at how much better your knowledge for diatonic harmonized arpeggios will become in just a short period of time!


When diatonic harmonized key practice is organized as arpeggios and then combined with focused attention on their neck patterns, and how you pick through them, your skills for this area will explode!

So, I need to ask you, do you want to get your key signatures and your chord harmony (for all the keys), memorized? Well… if you said yes, you’re going to have to give me 2 minutes of your time (per day) for at least about 3-weeks to get this done.

Not, one minute, but two minutes. Because I have an exercise for you that’s just under 2 min. long and it breaks down a key’s chord harmony into a routine that’s not only fun to play, but it’s also really quite easy to memorize!

On top of that, it’s also a great exercise for getting better at your picking technique! Plus, it sounds cool so it’s something that you’ll find fun to play. So, if you’re ready to try this – let’s get started.


GETTING STARTED:
The exercise I have for you focuses on a key signatures harmony. What this means is, when we take a key, (and for this lesson we’ll use the key of “F Major” for our demonstration purpose), so when we take a key and assign each step of the key its chord types, we get the harmony for the key.

Now, the good news is that the harmony always remains the same no matter what key that you’re in. And, the chord movement inside of the key is important to commit to memory because it always stays the same.

So, start by making sure that you know the chord movements inside of a key. I’m going to go through them right now and I’ll call out each chord...

Major, Minor, Minor, Major, Major, Minor, Diminished

Just memorize that sequence of chord qualities and you’ll always know all of the chords that are found inside any key signature used in music!


1st SHAPE and the EXAMPLE PICKING PATTERN:
The first pattern from the key’s harmony as a shape on the guitar looks like this…


When I was first shown this exercise, the teacher I had asked me to create a picking pattern with the notes so that I was “not only learning my harmony on the neck,” but I was also improving my pick hand technique as well.

I’ve taught this to a lot of players and I’ve found that having a picking pattern is valuable, so let me demonstrate how an example picking pattern might actually work.


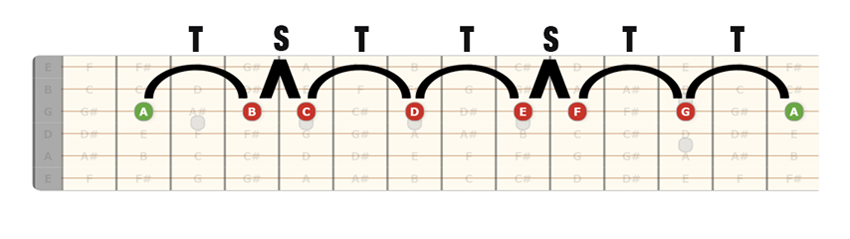
Keep in mind that the Root note of the first pattern, (or you could also think of it as an arpeggio pattern as well), the first root note is the note of “F” which is located on the 4th guitar string.

So, please start the pattern and end the pattern from that root note. That way, you’re always generating the correct interval layout of sound to be able to produce the color of the degree that you happen to be on. In this case, since we’re in the key of “F Major,” our Root note is an “F” and the quality of this pattern is “Major.”

Now, when it comes to a picking sequence I’m going to leave that up to you, but for today’s demonstration you can try using this example I have for you.

So, as you can tell the idea that we started with is all organized around, first selecting a key signature, then establishing the layout of the key’s first chord harmony, (or if you prefer you can just think of it as an arpeggio), and then, you can work out a picking pattern to use across the notes.


2nd SHAPE with the EXAMPLE PICKING PATTERN:
Now that we’re rolling along with this exercise, the next step is to move on to the next chord in the key. Remember, we’re in the key of “F Major,” so our second chord is built off of the second note of this key, and that note is the note of “G.” With the chord quality of, “Minor.”

Keep in mind that the root of this step of the key is “G,” so you’ll want to focus on that step to align the intervals correctly and create the color of Minor.


Also, remember to apply the picking pattern that we’d established from the “F Chord” back in the first pattern layout, but now applied to the “G Minor chord.


                         ____________________________________________________

I wanted to take a minute to let you know, that if you want to learn even more about scales and theory I have a great offer for you.

With any donation over $5, or any merchandise purchase from my Tee-Spring store, I’ll send you free copies of THREE of my most popular digital handouts.

One is called, “Harmonized Arpeggio Drills” (it’ll train you on developing your diatonic arpeggios).

Another one is my “Barre Chord” Handout which includes a page showing all the key signatures along with a chord progression that applies barre chords.

Plus, you’ll get my Notation Pack! It has 8 pages of important guitar worksheets for notating anything related to; music charts, guitar chord diagrams, and TAB.

As a BONUS, (from my "Over 40 and Still Can't Play a Scale" video), I'll also throw in a breakdown of all of the chords that are diatonic to the "F Major" scale.

As an EXTRA BONUS for my Phrygian Dominant video, I'll also throw in a breakdown featuring all of the chords that are diatonic to the Phrygian Dominant scale.

Just send me an email off of the contact page of CreativeGuitarStudio.com to let me know about either your donation or your Merchandise purchase and I’ll email you those digital handouts within 24 hrs.    

                       ____________________________________________________


THE FINAL STEP:
Now that you understand the basic principle for how we’re building our way through each step of a key signatures chord harmony, (or arpeggio harmony - however you’d like to look at it), the next thing that we’re going to do is travel step wise through all of the remaining notes of the key.


THE REMAINING PATTERNS OF THE KEY:
We’ll keep doing the same thing with the correct chord quality and the same picking pattern.

The third step of “F Major’s” harmony is “A Minor.”


The fourth step of “F Major’s” harmony is “Bb Major.”


The fifth step of “F Major’s” harmony is “C Major.”


The sixth step of “F Major’s” harmony is “D Minor.”


The seventh step of “F Major’s” harmony is “E Diminished.”


Once you’ve worked out your key, and you’ve determined all of the notes that are a part of the key, (along with establishing the patterns on the neck), your next stage of this exercise will be based upon moving through the entire key ascending and descending.

The daily goal will be to perform the entire routine up and down the fingerboard within a time frame of 2 minutes. In the beginning, 2 minutes might not be enough. But, as the days go on, and with practice, you should be able to accomplish the entire exercise within a 2 minute time frame.


___________________________________________________

GET GOOD NOW - JOIN THE MEMBERS AREA


Join Now

Guitar Chords | F Chord | Guitar Notes | G Chord | C Chord | D Chord | Guitar String Notes

Stop Practicing Songs! (DO THIS INSTEAD)

Learning songs on the guitar is one of the most commonly performed exercises that we do as guitar players. And, there's certainly nothing wrong with "learning" songs.


In fact, I know for a fact that we can gain some fantastic ideas out of learning songs. But, the thing is, for some guitar students, songs are the ONLY thing that they end up doing. And, in those cases, non-stop song practice is pretty much one of the worst things you can do.

In this lesson, I’m going to show you the difference between "learning" a song and "practicing" a song. And, I'll explain why they are NOT the same. Because "song practice" is most often a total waste of time when it comes to getting stronger at; neck knowledge, scale and chord theory, as well as, technique.

Although I encourage my students to learn songs, I don’t like to encourage them to spend hours and hours of their week practicing songs. The reason why is my long term experience with this as a teacher.

Let me explain, I’ve taught guitar as my primary job since the year 1992, and I’ve had over 1000 guitar students sit down in front of me to trust me to teach them how to play. And, in all cases when a student won’t learn the core elements of how music operates on this instrument, (but instead, they insist on only learning songs), their progress on guitar - for the most part - maintains a flat line in respect the development of their skills.

So, the thing is… what do you do instead of practicing songs?

Well, you can still learn about songs, but rather than invest a lot of time in them, you should instead focus on 3 main principles of developing your skill out of them. And, that’s exactly what we’re going to cover in this video!


The first idea that I want to get into here is all about the note locations on the neck and what knowing that can do for you as a guitar player. I always insist that my students understand; how the notes lay on the neck, how scale shapes operate, and why these shapes are the catalyst for creating a direction of sound in music, (like for example if a song is; Major, Minor).

Let me show you an easy way to begin developing this…

KNOW YOUR NOTES:
1a). Major Notes on Neck Exercise:
Study the key of “C” notes on the neck first. Use diagram paper and recognize the tone and semi-tone distances that occur between the notes. Afterward, take the notes of other Major keys across the fingerboard as well.


1b). Minor Notes on Neck Exercise:
Study the key of “A” notes on the neck first. Use diagram paper and recognize the tone and semi-tone distances that occur between the notes. Afterward, take the notes of other Minor keys across the fingerboard as well.

The next important idea has to do with something I’d mentioned at the start of the video. And, it was when I said, I’m not opposed to “Learning” songs, but what I need you to understand, is that I have noticed over the years when guitar students only work on “practicing songs,” as the ONLY thing they do, (as their sole method of studying the guitar), what I’ve seen time and time again is that their progress flat lines.

So, lets focus on this idea of, "Expanding Upon Everything You Learn."


EXPAND UPON ALL YOU LEARN:
I want to suggest taking anything that you’ll learn from a piece you have studied and almost immediately use it in such a way that expands upon whatever that idea is based out of.

For example, if you learn a song and in that piece there’s a, “suspended” chord. Research what a suspended chord is - find out what the term means, and learn how it’s applied.

One of the popular ideas that we discover early on, (when it comes to using chords), is the difference between major and minor. The major’s and the minors are used in songs all the time, but do you really understand them?


Let’s take a closer look. Major and Minor Chords:
The Major and Minor chords are the most popular chords. You’ll find them applied in pretty much every one of the songs that you’ll ever learn.

And, you’ve probably seen several of them already. But, do you really know their details? Like for example the “D major and D Minor” chords.


What are their notes?


What are their chord formulas?
What makes them, “Maj. / Min?”


This work is excellent practice that most players never really get into!

Earlier, I mentioned “Suspended” Chords. Do you understand them?: They are another popular chord that most guitarists never really learn about.

These suspended chord types apply two common chords (that everyone should become familiar with). They are; “Suspended 2nd” and the, “Suspended 4th.”Below you'll find them applied off of the root note of "D."


What are their specific notes?


What are their chord formulas?
What makes them, "Sus2" and "Sus4"


                         ____________________________________________________

I wanted to take a minute to let you know, that if you want to learn even more about scales and theory I have a great offer for you.

With any donation over $5, or any merchandise purchase from my Tee-Spring store, I’ll send you free copies of THREE of my most popular digital handouts.

One is called, “Harmonized Arpeggio Drills” (it’ll train you on developing your diatonic arpeggios).

Another one is my “Barre Chord” Handout which includes a page showing all the key signatures along with a chord progression that applies barre chords.

Plus, you’ll get my Notation Pack! It has 8 pages of important guitar worksheets for notating anything related to; music charts, guitar chord diagrams, and TAB.

As a BONUS, (from my "Over 40 and Still Can't Play a Scale" video), I'll also throw in a breakdown of all of the chords that are diatonic to the "F Major" scale.

As an EXTRA BONUS for my Phrygian Dominant video, I'll also throw in a breakdown featuring all of the chords that are diatonic to the Phrygian Dominant scale.

Just send me an email off of the contact page of CreativeGuitarStudio.com to let me know about either your donation or your Merchandise purchase and I’ll email you those digital handouts within 24 hrs.    

                       ____________________________________________________


PERFECTING A RHYTHM STRUM PART:
The final topic that I want to cover has to do with one of the weakest areas when it comes to developing playing skill. And, it’s an area for where often times a guitar student will go ahead and wrongly learn a rhythm strum part for song section, like an; Intro., a Verse or maybe the songs Chorus section.

Sadly students will keep practicing the strum idea wrong, (quite often for a really long time), and they’ll unfortunately be using the totally incorrect rhythm guitar strumming pattern.

Now, there’s generally a rule that I like to use with my own students in how to get the correct strum pattern, and it’s actually quite simple!

Just listen to the part on the original recording and tap your finger to the groove of the strum pattern that you hear. Feel the beat in time and listen for each beat's accent.

Then, learn to sing that groove, (internalize it). Finally, duplicate that pattern with your strum-hand with down and up strums that feel correct to you.

If you do this simple approach of learning a groove, you’ll easily get a solid handle on a song’s proper rhythm strum part and you’ll be playing it near perfect to the song every time.


___________________________________________________

GET GOOD NOW - JOIN THE MEMBERS AREA


Join Now

Guitar Chords | F Chord | Guitar Notes | G Chord | C Chord | D Chord | Guitar String Notes


The "10 Commandments" of Learning Scales (THOU SHALT!!)

If you want to build better scales there are definitely some things that you need to do, and other mistakes you will have to avoid in your scale training. In this lesson I’m going to give you the 10 “commandments” of scale training to help you not only build more skill from your scale study and use, but to also avoid many of the common pitfalls that often happen along the way...


Today we’re going to run through the ten commandments of learning scales. These are ten things that you should (or shouldn’t), be doing when studying scales on guitar if you’re wanting to develop your best playing ability and have the most musical success with scales.


So let’s get right into the first one, “Thou Shalt Always Map the Fingerboard.”
As we all know, scales operate within keys, and keys all have a Tonic (or Root Note), of the key. That’s the key’s naming note.

If you don’t know where the Root naming notes are “all over the neck,” you will not understand where all of the positions can be for playing any of the scales. So, you can’t forget (or neglect), to map the scale root notes all across the fingerboard.

If you don’t know how to do this, watch my lesson titled, “Do This Every Single Day (Master Your Neck).” It’s one of the most well organized and easy to follow videos posted on YouTube for teaching the basic principles of mapping out notes on your guitar.


Alright number two is; “Thou Shalt Include All 12 Key Signatures in Scale Practice.” The great thing about mapping the neck is when it comes down to practicing any scale based melody, if you move the idea through all the 12 keys it can be an excellent way to hit every scales root note!

Doing this also helps guitar players re-adjust the intervals found in scales, riffs, or licks, (for when the idea gets moved to any other musical key!). This means that key signature practice can be a very powerful way to get good at learning new melody lines and to become extremely proficient at improvisation.

If you don’t understand your keys, what they do, and how they get used in music, then watch my video on YouTube titled, “Over 40 and Still Don't Know Music Theory.” That video (and its lesson plan), thoroughly review the ideas and the application of all 12 musical keys.


The third commandment is, “Thou Shalt Never Play Scales Sloppy.” Guys if you ignore flubbed notes and you aren’t taking steps to correct messy guitar technique - please stop and establish a plan to fix this!

Good playing technique is especially important because badly played notes will also cause your rhythm and your feel to degrade. And, when it comes to fixing bad technique, you have a number of choices, because I’ve produced several YouTube video lessons that provide a lot of options for correcting bad playing habits.

I’ve made dozens of videos on this channel that are directed at playing; smoother, and cleaner notes with one of the most popular being my lesson titled the “Spider Walk” exercise.

The “Spider Walk” will go a long way to fixing your bad coordination habits. And, if you’d like to take things a step further, you can also study my “Guitar Technique” course in the member’s area.


The fourth commandment is, “Thou Shalt Learn Thy Scales in Every Area of the Neck.” In all of my years teaching people how to play guitar, if there’s one thing that guitar players tend to do over and over again its neglect learning how to play a; scale, a lick, or a riff, all over the entire guitar fingerboard.

In fact, one of the most common things that players will do is they’ll learn a riff or a lick from a scale, and then leave it in the one single place that they learned the idea. So, when you learn a guitar part, take that idea to at least two other locations on the guitar fret-board. That way, you’ll know it in 3 places.

I explained this system in detail on my YouTube video titled the, “System for Fingerboard Association.” Watch that video if you need more direction with taking ideas to other fret locations.

                         ____________________________________________________

I wanted to take a minute to let you know, that if you want to learn even more about scales and theory I have a great offer for you.

With any donation over $5, or any merchandise purchase from my Tee-Spring store, I’ll send you free copies of THREE of my most popular digital handouts.

One is called, “Harmonized Arpeggio Drills” (it’ll train you on developing your diatonic arpeggios).

Another one is my “Barre Chord” Handout which includes a page showing all the key signatures along with a chord progression that applies barre chords.

Plus, you’ll get my Notation Pack! It has 8 pages of important guitar worksheets for notating anything related to; music charts, guitar chord diagrams, and TAB.

As a BONUS, (from my "Over 40 and Still Can't Play a Scale" video), I'll also throw in a breakdown of all of the chords that are diatonic to the "F Major" scale.

As an EXTRA BONUS for my Phrygian Dominant video, I'll also throw in a breakdown featuring all of the chords that are diatonic to the Phrygian Dominant scale.

Just send me an email off of the contact page of CreativeGuitarStudio.com to let me know about either your donation or your Merchandise purchase and I’ll email you those digital handouts within 24 hrs.    

                       ____________________________________________________


The fifth commandment is, “Thou Shalt Include Time for Fun with Scales.” You have to always keep in mind that scales are the device that we use to create music with. We stack the scale tones to create chords, and we align the scale tones in interesting ways to form melodies.

So, there needs to be a period that we spend with the scales that we are practicing which includes having fun. Some musicians call this type of practice; wood-shedding, or noodling, or “wandering” notes musically.

It doesn’t matter what you call it. The important thing is you just absolutely have to do it! Because fooling around with the scale and having musical fun will get you the feel together for actually applying the notes that make up using the scale musically.

The sixth commandment is, “Always Honor the Feel of the Beat in Time.” This one can be especially bad with Beginner and Intermediate guitar students. And, it’s important to understand that the feel of the beat has to do with the long term development of what musicians will often call the body’s “inner sense for timing.”

Although some musicians get timing down quite easily (sometimes early on in their practice days), other musicians can either be quite bad with their sense for time, or they can be the opposite. They will end up as perfectionists with the development of time.

The perfectionist will tend to work for hundreds - if not thousands of hours - trying to master their sense for time… having it perfect within every area of their performance.

And, my suggestion is to; do your best to become a musician like that. Strive for constant perfection when it comes to your sense of timing – and do it for everything that you play.


The seventh commandment is, “You Shall Not Neglect the Significance of Duration.” If I were to pick one thing that a student who is new to the world of either composing or improvising with scales will seem to do over and over again – is they will play their phrases with the same duration, and not even realize that they’re doing it.

If you don’t know what Duration does, it’s the core of your musical ebb and flow. Musical duration is the length of time that notes are held. When they get sustained, they create phrases which are called the musical meter within the piece.

Duration is a concept of feel and time that produces the perception and the reflex of the music being composed or improvised. Duration is responsiveness to the notes of the scale that you’re working within.

So, it is vital to learn how to pay attention to your use of; 8th-notes, 16th-notes, triplets, syncopation and odd-meter so that the feel and the flow of what you play - will be interesting and unique, because without good control over duration, your music’s feel will suffer.

The Eighth commandment is, “Do Not Favor any One Area of the Neck Over Another.” Now, this is not just a problem for scales, it’s a problem for chords as well. Too often, students of the guitar will play songs, (or play a solo), in only one (or two) areas of the neck.

And, I can fully understand this, it’s all down familiarity and there’s nothing wrong with that as you are learning your way around the instrument.

Your goal should be to improve and stretch your knowledge for keys and scales everyplace on the guitar neck - so that one day you’ll be able to play your musical ideas all over the neck, with your knowledge (plus your understanding for scales and the fret-board), and you’ll become more versatile.

Like for instance - if you were playing a solo in the key of “D Minor,” your long term goal (in “D Minor,” or any other key), should be to view the whole guitar neck as one big friendly place. And, to be able to perform your songs, and to solo anywhere on the neck, no matter what key that you’re performing music in.


The ninth commandment is, “Honor Thy Skill and Thy Application for Phrasing.” When we explore the scale phrasing skills of any famous player, there’s always one thing that they’ll have in common with each other, and that’s their ability to phrase lines in a way - that presents the idea that they’re performing - so that it comes across as highly musical.

Now, this skill allows the melodies (or the harmonies that we create), to really connect with the audience… Ya know, phrasing… (good phrasing), is the ability that a musician has worked on for many years.

Over time we develop within ourselves the ability to take any scale into a musical statement and connect that statement into another one in a very individual way. And, every player does this differently with phrasing devices like; slides, bends, vibrato, trills, sweeps and legato all used in a way that are highly memorable for the listener.

So work on your skills for both these devices and for your musical ability, to help you phrase in a more memorable way. And, remember, we do this work for all of those who will be listening to our music. So, it’s important!


Our last of the, “10 Commandments of Learning Scales,” is this one… “Remember to Faithfully Honor Your Jam Sessions.” And, it’s important to note here that a “jam session” can be really anything!

From practicing a scale against a backing track that you either pulled up or created in Garage Band… or it could be a worked out composition that you’ve organized using several scales around different keys and different tonalities.

Maybe it’s just jamming with your friends on a Saturday afternoon on the front porch. Or, perhaps a weekend blues jam at your local town hall. Whatever it is, you’ve just got to go and jam these scales and put them into action. It’s critical to do this!

The only way that these scales will eventually become second nature, is when you use them to create music. If you don’t use them, you’ll forget them. And, we don’t want that to happen.

So, get out there, use these scales, apply them in musical ways and before you know it, all your scales will become second nature and you’ll be able to apply them very easily in any musical situation!


___________________________________________________

GET GOOD NOW - JOIN THE MEMBERS AREA


Join Now

Guitar Chords | F Chord | Guitar Notes | G Chord | C Chord | D Chord | Guitar String Notes