Discover a Most BEAUTIFUL Sound (OPEN "G Minor" Tuning)

If you have 10 min. I am going to help you learn about a great guitar tuning that will give you both a rich sound and an altered melodic range... It’s called “Open G Minor” tuning…


Be sure to take notes at the end because I posted a song-list that you can check into which contains songs that apply this open tuning.


The first thing that we will start with is going to be learning how to get the guitar into this unique Open “G Minor” sound.


THE OPEN “G MINOR” TUNING:

Open “G Minor” Tuning has the same note layout starting from three open “D” strings across the 6th, 4th and 1st strings. The same thing happens off of “Open G’s” found from the open 5th and 3rd strings.


The one unique string is the 2nd where we have an “Open Bb” string. Take some time (and have fun) …get creative with the notes by building a few riffs and chord ideas that function with the sound of “G Minor.”


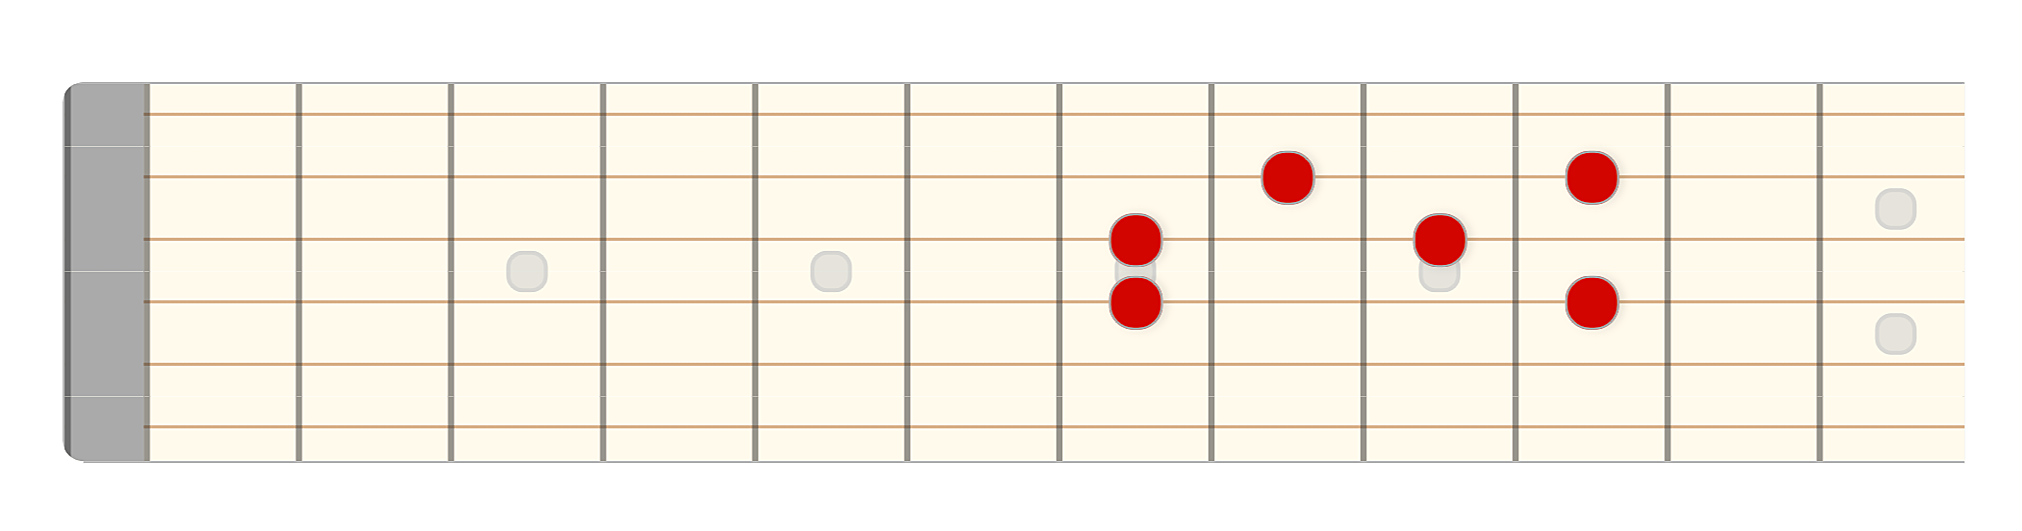
1ST POSITION NOTE LAYOUT
The note layout from the nut (open position) is very uniform. The "D" open and "G" open share a similar interval design. The unique string is once again found from the 2nd-string.


PRACTICE TIP:
Study the note layout and the interval relationships found in the first position of this tuning to both better understand, and also discover, a few interesting chord strategies, as well as, melodic applications of this tuning.


THE FULL 6-STRING OPEN
(and BARRE CHORD MINOR):
One of the most important ideas that presents itself with many an open string tuning is that they almost always create a full chord layout which incorporates all of the open strings.

In our case, the open strings obviously give us an open “G Minor” chord. This also means that we can pull that vertical alignment of notes across the neck laterally.

If we establish a fully vertical barre across all of the strings we produce a movable minor chord pattern. Here’s what a “C Minor” would look like in 5th position…


MOVEABLE UPPER-STRING MAJOR:
When it comes to the sound of Major tonality, a nice shape for the major chord (that can be made moveable along the span of the entire fingerboard) is one that’s organized off of the top 4 guitar strings.

Below is an example of this chord pattern set into the 2nd position, and thus creating an, “F Major” chord.


NOTE: The open 5th-string “A” can also be added to the low register of the “F Major” chord layout for creating the sound of a first inversion chord of (in this case), “F/A.”


MOVABLE DOMINANT 7th CHORD:
The Dom. 7th “V-chord” (of the key of “G Minor”), is a “D Dom. 7.” This shape requires a slight stretch out to reach the high 10th fret of the first string.

The chord is manageable but will likely require a little addition practice to manage the stretch. Since it’s an important chord in harmony, this Dominant 7th pattern is an excellent chord to get down because it allows for a strong Minor Key resolution back to the primary Tonic chord of “G Minor.”


                         ____________________________________________________

I wanted to take a minute to let you know, that if you want to learn even more about scales and theory I have a great offer for you.

With any donation over $5, or any merchandise purchase from my Tee-Spring store, I’ll send you free copies of THREE of my most popular digital handouts.

One is called, “Harmonized Arpeggio Drills” (it’ll train you on developing your diatonic arpeggios).

Another one is my “Barre Chord” Handout which includes a page showing all the key signatures along with a chord progression that applies barre chords.

Plus, you’ll get my Notation Pack! It has 8 pages of important guitar worksheets for notating anything related to; music charts, guitar chord diagrams, and TAB.

As a BONUS, (from my "Over 40 and Still Can't Play a Scale" video), I'll also throw in a breakdown of all of the chords that are diatonic to the "F Major" scale.

As an EXTRA BONUS for my Phrygian Dominant video, I'll also throw in a breakdown featuring all of the chords that are diatonic to the Phrygian Dominant scale.

Just send me an email off of the contact page of CreativeGuitarStudio.com to let me know about either your donation or your Merchandise purchase and I’ll email you those digital handouts within 24 hrs.    

                       ____________________________________________________


OPTIONAL “IV-MAJOR CHORD”
(“G” DORIAN MODE):
As a bonus idea, (to be able to open up your playing to the sounds of the Dorian mode), and so we can inject the sound of “G Dorian,” our last example will introduce the use the, “C Major” chord.


The chord pattern for “C Major” offers a popular sound to use when playing in, “Open G Minor” Tuning because it presents a color off of the "Dorian Minor" sound.


SONG SUGGESTIONS:
If you like open tunings and all of the interesting sounds that they produce, I think you’ll really enjoy working with the; Open G Minor Tuning.

If you have an interest in trying to play some songs that use this tuning then look into; John Renbourn’s song, “The Mist Covered Mountains of Home.”

There’s also John Fahey’s piece, “Dance of Death.”

One other song to look into is a number composed by German guitarist Peter Finger, and it is his piece called, “Elf King.”

Of course, there’s always the other direction, (a pure fun option), of simply using this tuning to write an all original song - all of your very own!


___________________________________________________

GET GOOD NOW - JOIN THE MEMBERS AREA

Join Now

Guitar Chords | F Chord | Guitar Notes | G Chord | C Chord | D Chord | Guitar String Notes

Do This AFTER Every Guitar Solo!

Most people who practice playing guitar solos tend to fall in love with every one of the latest licks that they learn. But, what about "after" the solo? We all enjoy being in the moment with every guitar lick, but if that's all that we care about, our level of musical improvement will stagnate...


Playing solos without reflection means that all we're doing is focusing on the next new guitar lick because it's the thing that feels like the most fun when practicing solos - so we tend to fixate on the licks and lines instead on the substance.

Sometimes a guitar player can go for years without doing any deep analysis about what that are truly playing.


HOW DOES THIS WORK?
When you train yourself how to become better at "learning to solo," you are feeding into the study of several important playing areas.

These include; knowing more about notes, learning scales, mapping the neck, using your ear, and knowing how to balance each interval that relates to the key that you're in.

If you don't take time "after the solo" to study what you played and how it that can help you to have better note choice and symmetry with what you play, you won't keep getting better as a guitar player and as a musician.

This lesson will help you reach a higher level of skill when it comes to performing guitar solos by introducing a comprehensive, "After Solo Review."


THE POWER OF ANALYSIS:
Being able to analyze what you play help you improve your knowledge of; root notes, key center, tonality, the notes on the neck, as well as, help you determine the intervals through scale degrees.

To get things started, I’m going to demonstrate a melodic idea that you can learn with me right now. It’s an easy melody - you won’t have any problem learning it.

Then, after doing that, we’re going to breakdown how this “After Solo” review can be done to help you get better with all of the things I just mentioned. So, let’s learn this example idea - right now.

The Lesson's Guitar Lick Example:


Next, I want to run through all of the ways that work the best to analyze a melody. Now, I do realize that obviously your solos will probably be a lot longer than this one statement that I just performed.

The principle of what we’re doing here will be no different - no matter how long or short your guitar solo might be.

Let’s get started working through how this “After Solo Review,” can work with our lesson's guitar lick melodic example.


VISUALIZE YOUR SOLO'S GEOMETRY:
1). Begin by visualizing the geometrical outline of how the notes of the guitar solo you just played - sit on the neck. The geometry of our idea looks like this…


FIND THE "FOCAL" TONE (ROOT):
2. Next, we need to use our ear to decide where the geometrical note outline’s focus tone,( or Root note), is located.

Often times it’s the first or the final note in the solo, but not always, so it’s important to play the notes ascending and descending along with the backing chords to decide where the collection of tones wants to find as its rest-point.

In our example the resting point is leaning to be at the 4th string’s, 7th fret.


DETERMINE THE NOTES:
3). Next, is one of the most important and most often over-looked steps for a majority of guitar players. And, it’s the step of making a quick study of what the actual notes are for the geometrical outline.


For our example the notes work out to be, (starting on the 4th string’s 7th fret).…

“A, C, D, E, G, A”


ACKNOWLEDGE THE ROOT TO OCTAVE:
4). At this point we’ve now learned that the note collection starts and ends on our Root Note that we located back in the previous step.

The note of, “A.” The next thing to do is confirm that the pattern we’ve organized has both a Root note as well as, an octave.


Learning this step has now officially anchored the entire note range for us, and also it’s officially formed a scale on the guitar neck as well.


                         ____________________________________________________

I wanted to take a minute to let you know, that if you want to learn even more about scales and theory I have a great offer for you.

With any donation over $5, or any merchandise purchase from my Tee-Spring store, I’ll send you free copies of THREE of my most popular digital handouts.

One is called, “Harmonized Arpeggio Drills” (it’ll train you on developing your diatonic arpeggios).

Another one is my “Barre Chord” Handout which includes a page showing all the key signatures along with a chord progression that applies barre chords.

Plus, you’ll get my Notation Pack! It has 8 pages of important guitar worksheets for notating anything related to; music charts, guitar chord diagrams, and TAB.

As a BONUS, (from my "Over 40 and Still Can't Play a Scale" video), I'll also throw in a breakdown of all of the chords that are diatonic to the "F Major" scale.

As an EXTRA BONUS for my Phrygian Dominant video, I'll also throw in a breakdown featuring all of the chords that are diatonic to the Phrygian Dominant scale.

Just send me an email off of the contact page of CreativeGuitarStudio.com to let me know about either your donation or your Merchandise purchase and I’ll email you those digital handouts within 24 hrs.    

                       ____________________________________________________


DETERMINE SCALE DEGREES:
Now that we’ve got our scale mapped out from root to octave, the next idea is also really important. Our next step is another one of those things that’s rarely if ever done by guitar students.

What it covers is taking a look at comparing the scale steps we’ve performed in our solo, and comparing them to the Major scale off of the same root.

In our case, that root is the note of “A.” In the “A Major” Scale we have the notes of “A, B, C#, D, E, F# and G#.”


In our guitar solo, (or rather "guitar melodic statement"), we have the notes of “A, C, D, E and G.” This means we’ve lowered two critical tones of the “A Major” scale, (C and G).

The lowered tones are referred to as flatted 3rd and flatted 7th and they establish the tonality called MINOR.


5). Here’s how the "Scale Degrees" outline would look on the fingerboard.


RE-LOCATE THE NOTES OF YOUR SOLO:
The next step of our, “After Solo Review,” is all about stretching your knowledge of the fingerboard by re-locating the notes (that were a part of the original solo), over to another area of the fingerboard.

Let’s do this by moving our group of notes over to the guitars 2nd position with the lower root note now off of the 3rd string.

6). Re-location of the original scale tones


PRACTICE YOUR NEW LOCATION:
When you have the new area of the fret-board organized (with the same notes from your solo), take either the entire solo, or a few segments of your solo over to the new region.

7). Learn to play through that guitar lick we’d started the lesson with, in this new position to demonstrate how the line adapts to the new area of the neck and to the new guitar strings.


AMALGAMATE BOTH NECK REGIONS:
Next, it’s important to connect the first region of the neck where you played your original solo over to the new region of the neck that established a secondary range of notes.

If we do that with our neck patterns we wind up with two fret-board areas giving us more soloing options!

8). Below are both neck regions show as one larger layout on the guitar.


EXPAND NOTES BEYOND THE SOLO:
Finally, the last part of this exercise will help you gain more fingerboard awareness with the notes that make up the entire span of both of the neck regions.

What we’re going to do is fill in any additional notes that weren’t accounted for.

9). Notes that were not accounted for are shown in "Blue" color.


___________________________________________________

GET GOOD NOW - JOIN THE MEMBERS AREA

Join Now

Guitar Chords | F Chord | Guitar Notes | G Chord | C Chord | D Chord | Guitar String Notes


Doing This Will Make Your Blues Rock Riffs Twice as Good!

Practicing how to play, as well as compose, classic Blues-Rock Riffs is one of the most fun things that you can do to build a better connection to scales and learn how to use any keys diatonic intervals in a consistent way...


In this lesson, I mention one of the world's most legendary riffs out there as an example, the opening riff from Lynyrd Skynyrd's, "Sweet Home Alabama." That riff, (and other classics like it), employ a collection of intervals that are used consistently to create great riffs.


WHAT IS BEHIND THE BLUES-ROCK RIFF:
The problem with why players have trouble with these riffs is that they tend to have a limited understanding of musical intervals and keys. This makes it difficult for them to understand (and spot), the formulas that are being used to establish note set-up's in a classic Blues-Rock riff.

Those note set-up's are important to understand because they are the one's that make riffs like, "Sweet Home Alabama," historic!

Once you learn the four common interval applications for classic Blues-Rock Riffs, you'll develop your riffs faster and you'll compose original ideas with greater ease. These riff principles create a formula and once the formula is applied consistently that formula operates like a "work of genius" to help you develop riffs faster and easier!

Blues Rock riffs are one of the main reasons behind why so many people pick up the guitar! And, one of the most historic riffs out there has to be, “Sweet Home Alabama,” by Lynyrd Skynyrd.

This 1974 classic riff has all of the elements that make up the reason why this riff (and other classic riffs like it), have become not only so popular to the general public, but also popular as riffs to learn for those of us who already play guitar.

The hook used to build riffs like “Sweet Home Alabama,” is genius and can serve as a catalyst for inspiration onto other riffs. And so, in this lesson we’re going to learn about how the structure of classic riffs will apply a common musical phrasing within the intervals that can be duplicated and used again and again to both learn more of the other classic riffs out there and also compose your own riffs as well.


THE FOUR MAIN RIFF PRINCIPLES:
Classic Blues and Rock Riffs like “Sweet Home Alabama,” or Ozzy Osborne’s, “Crazy Train,” or Angus Young’s “Back in Black” they all apply four main principles.

These are:

1). the use of, Root notes into Octaves and Perfect 5th's in order to either start (or possibly to drone), off of the key centers’ naming note.

2). the common push that’s typically applied from the Minor 7th interval used for the riff’s turnaround.

3). the riffs breakdown or the full-stop that often applies the use of a Perfect 4th interval for a break in the groove of the riff.

4). the application of the Perfect 5th and Minor 7th used during resolutions to produce more impact when the riff is headed for its turnaround - back to its starting point.

Now that you know the four principles that can create a historic / genius Blue Rock guitar riff, let’s zoom in on the neck, and actually apply these ideas in some riff examples that target each one of these four principles.


LEARNING THE INTERVALS:

Example 1).
ROOTS - OCTAVES - PERFECT 5th’s
The use of, Root notes into Octaves and Perfect 5th's in order to either start (or possibly to drone), off the key centers’ naming note.


Example 2).
THE PUSH OF THE MINOR 7th
The common push that is typically applied from the Minor 7th interval used for the riff’s turnaround.


                         ____________________________________________________

I wanted to take a minute to let you know, that if you want to learn even more about scales and theory I have a great offer for you.

With any donation over $5, or any merchandise purchase from my Tee-Spring store, I’ll send you free copies of THREE of my most popular digital handouts.

One is called, “Harmonized Arpeggio Drills” (it’ll train you on developing your diatonic arpeggios).

Another one is my “Barre Chord” Handout which includes a page showing all the key signatures along with a chord progression that applies barre chords.

Plus, you’ll get my Notation Pack! It has 8 pages of important guitar worksheets for notating anything related to; music charts, guitar chord diagrams, and TAB.

As a BONUS, (from my "Over 40 and Still Can't Play a Scale" video), I'll also throw in a breakdown of all of the chords that are diatonic to the "F Major" scale.

As an EXTRA BONUS for my Phrygian Dominant video, I'll also throw in a breakdown featuring all of the chords that are diatonic to the Phrygian Dominant scale.

Just send me an email off of the contact page of CreativeGuitarStudio.com to let me know about either your donation or your Merchandise purchase and I’ll email you those digital handouts within 24 hrs.    

                       ____________________________________________________


Example 3).
BREAKS and FULL STOPS WITH THE PERFECT 4th
The rhythmic breakdown, or the full-stop that applies the use of a Perfect 4th interval for a “break in the groove” of the riff.


Example 4).
RESOLUTIONS WITH MINOR 7th and PERFECT 5th
The application of the Perfect 5th and the Minor 7th used into or during the riffs resolutions to produce more impact when the riff is headed for its turnaround - back to its starting point.


CONCLUSION:
If you enjoy the way that these riffs sound, and you want to continue experimenting with composing more of your own original Blues-Rock or Southern Rock riffs, keep the ideas that we’ve gone over in this lesson at the forefront.

The notes that are involved with the; resolutions, the breaks, the punches, and those intervals that get used off of the start of these riffs will all tend to follow a common direction.

In other words, classic riffs follow a ‘RIFF’ formula – a formula that works, (and it works consistently), to create memorable riffs from popular scales, like the; “Minor and Major Pentatonic,” the Natural Minor and the Mixolydian Mode (along with the notes of the traditional Blues Scale).

With some time spent practicing, you’ll be able to apply these principles and create some excellent sounding Blues Rock riffs of your own in no time.


___________________________________________________

GET GOOD NOW - JOIN THE MEMBERS AREA

Join Now

Guitar Chords | F Chord | Guitar Notes | G Chord | C Chord | D Chord | Guitar String Notes