LEARN 9 Strum Patterns - Cover 1000's of Songs!

If you want to get good at playing rhythm guitar (and do it fast), but you think it’s impossible because you don't know any strumming patterns, then you are definitely going to want to watch this video.

Whether you are a beginner, or you currently already have a few strum patterns down, it doesn’t mean that you have to compromise on your ability for knowing a collection of the most important strumming patterns in music.


The key to building strength and getting stronger on; rhythm duration, strum patterns, strum dynamics and stylistic grooves is understanding that you are only as strong as your weakest rhythmic skill.

The 9 strum patterns in this lesson actually give you a chance to work on the weak links in your rhythm guitar skill set to become even better at rhythm guitar than you can from simply learning how to strum your way through random songs.


In this post I’m going to show you NINE strum patterns – that are so versatile - once they're developed they will be able to help you to play rhythm guitar parts for THOUSANDS of songs.

We’re going to cover strum patterns that work well in many different music styles like; rock, rhythm and blues, pop music, soul music, Folk, bluegrass, country, funk, smooth jazz, and traditional blues and many others.

You see, by learning this collection of NINE strum patterns, you’ll have the ability to set the stage for music in all of those styles I just mentioned.


These nine strum patterns are the smaller rhythm strumming patterns that can be learned and then modified as you see fit to work excellent when it comes to performing Rhythm Guitar in all of those music styles!

So, let’s dig into this and get started with learning these NINE strum patterns for becoming a more versatile rhythm guitarist…


Our first chord in play will be "G Major"


Pattern 1).
Pop, Rock, Country (slow for Folk, speed up for Bluegrass)

Pattern 2).
SuperTramp, Led Zepplin


Pattern 3).
Eagles, Garth Brookes, Willie Nelson


Our next chord in play will be "D Major"


Pattern 4).
Soul, i.e., Al Green, Sam and Dave, Marvin Gaye

                         ____________________________________________________

I wanted to take a minute to let you know, that if you want to learn even more about scales and theory I have a great offer for you.

With any donation over $5, or any merchandise purchase from either my Tee-Spring, or my Zazzle store, I’ll send you a free copy of THREE of my most popular digital handouts.

One is called, “Harmonized Arpeggio Drills” (it’ll train you on developing your diatonic arpeggios).

Another one is my “Barre Chord” Handout which includes a page showing all the key signatures along with a chord progression that applies barre chords.

Plus, you’ll get my Notation Pack! It has 8 pages of important guitar worksheets for notating anything related to; music charts, guitar chord diagrams, and TAB.

As a BONUS, (from my "Over 40 and Still Can't Play a Scale" video), I'll also throw in a breakdown of all of the chords that are diatonic to the "F Major" scale.

As an EXTRA BONUS for my Phrygian Dominant video, I'll also throw in a breakdown featuring all of the chords that are diatonic to the Phrygian Dominant scale.

Just send me an email off of the contact page of CreativeGuitarStudio.com to let me know about either your donation or your Merchandise purchase and I’ll email you those digital handouts within 24 hrs.    

                       ____________________________________________________


Pattern 5).
Smooth-Jazz, Rhythm & Blues (Smokey Robinson, Isaac Hayes)


Pattern 6).
Folk Pop (Neil Young, Pete Seeger, Ron Sexsmith)


The next chord in play will be, "D Dominant 9"


Pattern 7).
Pop Funk, Funk-Soul, (Prince, Curtis Mayfield, Kool and the Gang)


Pattern 8).
Heavy Funk, (James Brown, Rick James, R.H.C.P., Hendrix)


Our last chord for these rhythm exercises will be "A Dominant 7"


Pattern 9).
Traditional Blues (the Shuffle Feel) Buddy Buy, Muddy Waters, Robert Cray, Albert King, Rolling Stones


CONCLUSION:
Let’s face it guys having these 9 rhythm strum patterns as your foundation offers you the variety with rhythm strumming that can be used as your rhythmic base to strum; eighth-notes, sixteenth-notes, syncopated ideas and triplet rhythms across all of the most popular styles of music.

Whether you’re trying to get better at strumming along to a song, or you’re just trying to compose your own original rhythm strumming part for something that you’re writing - the fact is - these 9 patterns can offer you the framework to build a stable foundation for rhythm strumming that will give you a lot more skill when playing rhythm guitar.

And, these patterns also offer the opportunity to become more versatile! So that means, no more excuses when you’re called upon to strum guitar in a new style of music.

___________________________________________________

GET GOOD NOW - JOIN THE MEMBERS AREA


Join Now

Guitar Chords | F Chord | Guitar Notes | G Chord | C Chord | D Chord | Guitar String Notes

Play These 2 Notes in EVERY Guitar Solo...

Playing the "perfect" note at "just the right time" is one of the most common goals of every guitar player! In this video, I’m going to show you how to train your eyes, ears and hands to play the best notes at just the right time during a solo...


You'll learn simple methods for never playing lousy sounding notes again and you'll give yourself the fixes to play the best notes based upon "Chord Tone Targeting." 

Plus, you'll learn how to avoid the most common mistakes that all guitarists make when they are soloing.

It doesn't matter whether you can play a solo now, or if you struggle to do any soloing whatsoever. Regardless, you’ll find the tips in this lesson incredibly helpful and I guarantee you will be doing better guitar solos by the time the video is over.

WATCH THE VIDEO:


In this lesson we’re talking about playing melody and learning the best notes to hit for when you set out to play lead guitar. 

My goal for you by the time this video is over, is to make sure that you’re not only aware of the two best notes to hit while playing a guitar solo, but that you’re hitting them more often when you do set out to play a solo.

I don’t care if you’re an advanced soloist (and you’re playing a lot of solos right now), or if you’re struggling to even play one decent guitar solo. 

If you adopt this two note targeting idea that I’m about to show you here - I promise that your guitar solos are going to change for the better – starting right away!

Let’s get right into the first idea to start things off – and that is your understanding of backing chords.


BACKING CHORDS:
Backing chords are the chords that are played in behind your guitar solo.

For example, if we were in the key of, “A Minor,” and we had to play a solo over a chord progression that went *from; “Am, to Em, to Dm,” and then to “G Major,” that group of chords would establish our backing track.


Each chord of a backing track relates to the key signature out of where those chords come from, and this is called the keys harmony.

In music, keys establish the chord harmony and everything is based upon the scale tones and the chord types that relate back to the specific steps of the key.


CHORD TONE TARGETING - SINGLE CHORD:
When you’re just getting started with playing guitar solos, and you want to hit all the best tones - then the fastest route to achieving that, is to focus on just one chord at a time using a concept called “chord tone targeting.”

Since you’re new to all this, that chord progression that I initially mentioned, (with those four different chords - one in each measure), would be far too challenging!

So instead, let’s focus only on the first chord of, “A Minor.”


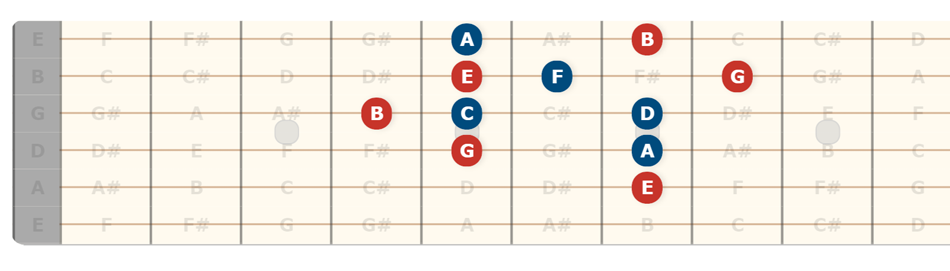
The “A Minor’ chord has three notes that are based off of the; *Root, then the note 3-tones away from the root, and then finally the note that is 5-tones away.


"A Minor" Chord Degrees:

The specific notes that make up the “A Minor” chord *are the, “A, the C, and the E tones.”

 "A Minor" Chord Tones:

Practice Routine:
The practice routine that I’m going to suggest will focus on recording a static chord vamp of “A Minor,” and then over that chord your goal will be to play a small scale shape to keep everything more manageable.

However, when the phrases you perform wrap-up, I’m going to ask that you end your ideas upon the chords 3rd or the chord’s 5th.

With the 5th chord tone being the most favored.

Of course, the root note will also be fine, but since it’s the root, it’s very generic sounding and you’ll definitely notice that! – Especially after you practice targeting that 5th chord tone!

So, let’s get things started with this practice approach (by learning to target the chord tones of an, “A Minor” chord).


Static Chord Vamp: "A Minor Chord"


“A Minor” Practice Pattern – Small Scale Shape on the Neck


                         ____________________________________________________

I wanted to take a minute to let you know, that if you want to learn even more about scales and theory I have a great offer for you.

With any donation over $5, or any merchandise purchase from either my Tee-Spring, or my Zazzle store, I’ll send you a free copy of THREE of my most popular digital handouts.

One is called, “Harmonized Arpeggio Drills” (it’ll train you on developing your diatonic arpeggios).

Another one is my “Barre Chord” Handout which includes a page showing all the key signatures along with a chord progression that applies barre chords.

Plus, you’ll get my Notation Pack! It has 8 pages of important guitar worksheets for notating anything related to; music charts, guitar chord diagrams, and TAB.

As a BONUS, (from my "Over 40 and Still Can't Play a Scale" video), I'll also throw in a breakdown of all of the chords that are diatonic to the "F Major" scale.

As an EXTRA BONUS for my Phrygian Dominant video, I'll also throw in a breakdown featuring all of the chords that are diatonic to the Phrygian Dominant scale.

Just send me an email off of the contact page of CreativeGuitarStudio.com to let me know about either your donation or your Merchandise purchase and I’ll email you those digital handouts within 24 hrs.    

                       ____________________________________________________


CHORD TONE TARGETING - TWO CHORDS:
The next thing to do is to expand out to another chord for this exercise routine so that you can become competent at doing this chord tone targeting practice over more than one chord.

The next chord that we’re going to use will be the “Em.” You can select any chord you’d like, but for our exercise I’m going to just randomly select the “E Minor” chord.

Because understanding harmony is really important, you’ll want to know where this chord exists within the key of “A Minor” (and it exists upon the 5th degree of the key).


Prior to jamming out phrases around this chord we are also going to need to know the specific chord tones that are found within our chosen chord of, “E Minor.”

The structure is still the same as to what we had done from defining the “A Minor” chord. The notes are all based upon that Root, 3rd and 5th concept.


 "E Minor" Chord Degrees:

From the root of “E” we add upon it a “G note” and on top of that we also add the note of “B.” And, now we have our second chord and we’ve established it’s notes.


 "E Minor" Chord Tones: 


Now, it’s time to start practicing the targeting of chord tones for both “A Minor” and “E Minor” chords…


“A Minor to E Minor” Practice Pattern – Small Scale Shape on the Neck.


The key of “A Minor” chord progression that I am going to introduce next covers an “A Minor chord to a D Minor chord.”

In order to play the chord tone targeting approach that I’m suggesting we’re going to need to focus on playing phrases that specifically target the chord’s third of “G” as well as, the chords 5th of “B.”

Two-Chord Vamp: "A Minor to D Minor Chord"


CONCLUSION:
Now that you’ve become familiar with simple scale layout patterns that can get you started for both a single chord and for two-chords, play over the chord progression of “A Minor” to the chord “D Minor” so that you can get a taste for how straight forward this practice method is to do on guitar. 

One of the most important things to understand is that after practicing this for awhile - the ability to target chord tones, becomes more or less automatic for your; Eyes, Ears and for your hands.

After a period of time spent studying all this, what happens is that as the chords go by in a chord progression you’re gonna start to feel more confident about how you play phrases.

With continued guitar playing and more practice, confidence will become even better from the development of a natural set of skills we call musical intuition (which basically evolves out of hearing, seeing and feeling where your hands want to instinctively travel to next on the instrument).

It takes time and patience to get good at this, but with doing the work you’ll start to see results rather quickly, so you’ll definitely feel motivated to keep going with your studies!


___________________________________________________

GET GOOD NOW - JOIN THE MEMBERS AREA


Join Now

Guitar Chords | F Chord | Guitar Notes | G Chord | C Chord | D Chord | Guitar String Notes

Always Do This BEFORE Playing Guitar! (HUGE DIFFERENCE)

Would you be interested in a way to drastically improve your guitar playing? Just do this one thing before every time you sit down and start playing guitar and I guarantee you will get better skill and better accuracy in no time...


I’m not talking about some "secret" guitar exercise, or a daily collection of guitar drills that will just pile on tons of work for you. No, it’s actually much simpler than that.

That said, it’s not going to be easy because it will require discipline to integrate into your guitar playing day. 

In this post, I’m going to make you aware of your own efforts for playing more accurately and how you can get better right and left hand coordination.

If you integrate this idea, (and hopefully you will), it will reveal to you how much more you have to give when it comes to better guitar playing.


WATCH THE VIDEO:


In this post I’m going to give you the key, the one thing you should do before every single time you play guitar that will instantly make every note you play better. And, it involves perfection of your efforts when you play notes and chords on the fret-board.

Now, this is not my idea or anything I didn’t come up with this, it actually is from one of the most highly respected guitar instructors I’ve ever sat down in front of, and that’s the legendary Jazz guitarist and educator “Howard Roberts.”

See, Howard impressed upon his students, the importance of never just jumping into playing. But rather to take 5 min prior to playing anything in your day and approaching what you do in that small window of time with absolute complete perfection.

So, Let’s dig a little deeper into this and get started with what Howard Roberts passed on to me, and now I’m about to pass on to you as the key to always do each day BEFORE playing the guitar.


SUPER-CHOPS:
To get started, I’d like to cover two sections from the famous Howard Roberts book, “SuperChops.” 

Now, even though this book was published back in 1978, what I’m about to share with you is every bit as important today as it was back then when these words were written.

“At the beginning of each day, warm up for 5 min. playing notes all over the fret-board. Play very slowly on low, high and medium pitches to develop the feel for string travel in a given picking area. 

This is important because notes played in different areas of the neck have different feel and string travel, and not balancing this at the start of your day can create coordination problems between the left and right hands. 

Your daily goal is to have all attacks occur smoothly and perfectly with the left and right hands operating with excellent simultaneous synchronization.” 

Let’s zoom in on the guitar so you can find out what this looks like.

Exercise - Video Clip 1).


PERFORMANCE HANG-UPS:
Now, what Howard Roberts is really saying here has to do starting from a point of slow perfection. 

If we begin each day with slow perfect playing, the rest of our day will carry on with a level of excellence that corresponds to the work we had done upon starting our day.

Now, let me share with you another exert from his SuperChops book about the elimination of performance “Hang-ups.”

“During the 5 min time frame before starting your guitar playing day, make sure to play a series of notes very slowly and listen very carefully for flams between the pick attack and the note being pressed down by your fretting hand. 

Start with all down-strokes making every note sound as loud and as strong as the next. Then use all up-strokes in the same manner playing short scale sections as well as, interval skips. Then, switch to consecutive down and up strokes, and finally switch direction playing consecutive up - then down strokes.” 


Let’s once again zoom in on the guitar so you can learn exactly how this works.

Exercise - Video Clip 2). 


Howard Roberts was without a doubt a very highly thought of player at an incredible level of skill. 

Musicians like him, all possess one common trait. They fully understand that the growth process of learning an instrument is about improving perfection.

The important part of learning “instrument playing perfection,” has to do with what you play and how you play the period before you start playing guitar for fun every day.

So, if you switch to considering the overall physical feeling of playing notes slowly and perfectly at the beginning of your day. 

And, you start to consider how the quality of each note that you play sounds, and how the pick strokes and the note location on the fingerboard can have a role in creating that, then you’ll reach a new level of playing skill that will have you persist with greater levels of playing perfection through the remainder of your day.


CONCLUSION:
Alright, in wrapping up, I want to add one more piece to this topic and it has to do with what really happens during progress on an instrument.

It’s actually the reverse of what most players think it is... See, progress involves an uphill climb. 

And, as a player your growth process has more to do with how you begin your day (and how long during your day) that you’re trying to perform things that you can’t play very well.

And, this is important because it’s the musical ideas that stretch you and make you feel like you’re pulling a train uphill that are actually the things which make you a better musician. 

If you only play things that make you feel like you’ve got the world by the tail, you’re not expanding your horizons and challenging your skill set to reach for higher levels of ability.

Think of your guitar playing as a chart that shows your skills increasing in value.


As you ascend in skill you’ll be passing through periods of Self Questioning, of Further Progress, of Plateau’s and then more Self Questioning and more Progress. And, that right there really is the recipe for musical excellence!
___________________________________________________

GET GOOD NOW - JOIN THE MEMBERS AREA


Join Now

Guitar Chords | F Chord | Guitar Notes | G Chord | C Chord | D Chord | Guitar String Notes

How to Build BIG Neck Patterns (GUARANTEED!)

To build BIG Neck Scale Patterns, you have to start by doing the right exercises. Doing things like 4 or 5 fret scale patterns is not going to help you in your pursuit of bigger scales. The trick is to learn how to break down outer unison tones and showcase them on the outer edge of a core scale shape...


The lack of unison tones means there's no cross-over tones. This can only function to keep your scales small. 

However, by organizing the use of unison tones we increase the span of the scale and we create more options across the neck for better sounding and longer lead guitar lines.

If you want to learn how to build big scales at home to create Major Solos (that you can take to the recording studio or to solo with when you play live on stage), the one thing you don’t wanna do is sit at home for hours practicing the in position scales.


WATCH THE VIDEO:


I know that the in position scale patterns are shown in all the books, and they can be helpful to learn smaller 4 or 5 fret layouts for scales to help get you started. 

But, to play bigger scales and write solos using them, you’ve got to work at organizing the scales in a specific way on the guitar neck.

We're going to get started with a complete system that you can apply to your at home practice right now that’ll help you learn how to play bigger Major Scale Solos - at home, at the studio, or up on stage.


SCALES:
The first thing to know about before you build big scales and play a solo with them, is what the scale’s notes are. For our examples, we’re going to use the “D Major” scale.


The key of “D” has two sharps, “F# and C#.” And, all of the other notes are natural tones… Here’s how it looks on the fret-board based off the open

4th-string:
Basic Open 4th-string “D” Major Scale


HARMONY:
The next thing we need to focus on is what the chords are that are found inside the scale we want to use. In the key of “D” Major there are six consonant chords (those are stable Major and Minor chords).

These include the 1st through to the 6th chords of:


“Dmaj, Em, F#m, Gmaj, Amaj, and Bm.” 

There’s also an unstable chord known of as a “Dissonant” chord that’s built off of the 7th step of the scale, it’s called the Diminished. In the key of “D” we have a C# on that step and the chord type there is the “C# Diminished.”


Let me show you how you can create a collection of chords from within the key of “D” to jam over.


Key of “D” chords:
organized into a chord progression for solo practice…


The key of “D” chord progression I just played offers a group of four chords taken from the 1st, 6th, 3rd and 5th notes of the “D” scale. In music theory – harmonic analysis - we refer to this type of chord progression as a; “1, 6, 3, 5.”

The chords are performed like this;


                         ____________________________________________________

I wanted to take a minute to let you know, that if you want to learn even more about scales and theory I have a great offer for you.

With any donation over $5, or any merchandise purchase from either my Tee-Spring, or my Zazzle store, I’ll send you a free copy of THREE of my most popular digital handouts.

One is called, “Harmonized Arpeggio Drills” (it’ll train you on developing your diatonic arpeggios).

Another one is my “Barre Chord” Handout which includes a page showing all the key signatures along with a chord progression that applies barre chords.

Plus, you’ll get my Notation Pack! It has 8 pages of important guitar worksheets for notating anything related to; music charts, guitar chord diagrams, and TAB.

As a BONUS, (from my "Over 40 and Still Can't Play a Scale" video), I'll also throw in a breakdown of all of the chords that are diatonic to the "F Major" scale.

As an EXTRA BONUS for my Phrygian Dominant video, I'll also throw in a breakdown featuring all of the chords that are diatonic to the Phrygian Dominant scale.

Just send me an email off of the contact page of CreativeGuitarStudio.com to let me know about either your donation or your Merchandise purchase and I’ll email you those digital handouts within 24 hrs.     
                       ____________________________________________________


Now that you have a key, and the notes of the key are known to you, as well as, the chord harmony of the key is known, (along with a chord progression has been composed), you’re ready to start practicing how to layout and perform a big scale solo on the neck!

Next, let’s learn how exactly this concept operates on the guitar through a study of various neck patterns…


SCALE NECK PATTERNS:
Big scale layouts on the neck can seem overwhelming for guitar players because the notes are very spread out and at first glance they seem to encompass a very large area. But, there is an easier way to deal with this...

If you look closely at the diagram below you’ll see a group of red colored notes along with a group of blue colored notes. There’s also three green notes, (those green ones are just simply the scales key notes of “D").


The Big Scale Neck Pattern:


If you treat the red notes as the primary tones and then treat the blue color notes as optional notes, you create two fret-board directions.

You can use that directional idea to map out the flow of each phrase of your solo so that it can either travel toward the head stock - playing down to the left.

Or, if you wanted a phrase of your solo that you could play to travel up to the guitar’s body you could play upward to the right. 

If you looked at each of these directions as separate ideas on the neck, you’d have a pattern like this for the head-stock direction:


Let’s learn a lick that from that layout:


If you wanted a phrase that you could play to travel up toward the guitar’s body, you could have a pattern on the neck like this:


With this pattern, you could play a lick that could function like this one does:


THE 5-FRET RULE:
When studying how to get organized on the neck with bigger scales, it’s really important to take into consideration the 5-fret rule.

Every five frets we can have a duplicate of a scale tone that exists someplace else on the guitar.

Once you spend the time building a few Bigger Scale Patterns (like the one that we covered across 8 frets here in this lesson), you’ll have a much easier time with being able to choose how you want to play the duplicate notes. 

You'll also better understand which duplicate notes will end up working the best for you in the solo that you’re performing.

This method isn’t complicated and it works very quickly for helping you better navigate notes and map out scales across the guitar neck easier when you want to apply a bigger scale layout for your guitar solo.


___________________________________________________

GET GOOD NOW - JOIN THE MEMBERS AREA


Join Now

Guitar Chords | F Chord | Guitar Notes | G Chord | C Chord | D Chord | Guitar String Notes