1 Simple Technique ANY Guitarist Can Learn in 1 Minute!

How would you like to learn one simple guitar technique that is so easy to do you could start using it in less that a minute? Well, if this sounds interesting be sure to keep reading because this lesson is going to be the beginning of something special in your guitar playing...


One of the problems that guitar players face when trying to connect chords is the understanding for how to begin adding in a few simple, (but well connected), bass lines. 


Most guitarists will often refer to these "connecting lines," as those "bass-line filler notes played from one chord to the next." But, regardless of what you call them, adding in a few well placed passing notes (from one chord to another), is still quite a challenge for most guitar players. 


A commonly overlooked aspect of doing this work, is that if all you're going to do is play crossover notes between chords, the method that you apply doesn't need to be very complex.


In this video I'm going to show you the perfect way to add filler notes from one chord to the next. This approach is going to develop an easy and fast way to effectively organize bass tones between chords.


WATCH THE VIDEO:


GOT 1 MINUTE TO LEARN A GREAT IDEA?:
In this lesson were going to talk about a quick and easy idea that will only require a minute (or less), to integrate into your guitar playing. It’s so easy to do and it sounds so good that you’ll take the principle of how this works into almost every playing situation from here on out. 


This idea is generally referred to as “Approach from Above / Approach from Below.” And, it has to do with using either an interval (or a couple of intervals), played either below or above the root note of chords found in a progression. 


I know this sounds easy (and it really is), but like all guitar techniques there are a couple of things to keep in mind when you apply it. So, be sure to stick with me til the very end of the video so that you can learn all of the specific details about exactly how this idea works.


GETTING STARTED:
In getting started, let’s learn how this “Approach from Above / Approach from Below,” principle operates on the fingerboard with a quick demonstration of the technique in action. 


We’ll set ourselves up in the key of “E Minor,” using a couple of Barre Chords built from the 5th and 6th string root. Here’s our first example, based upon the idea of, “Approach from Below.”


Example 1). “Approach from Below” 

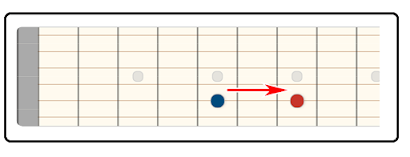
Using approach from below tones are the easiest to integrate because they are the tones that are found from a whole step under the Root of each Minor chord, or generally a half-step (1 fret) under Major chords.


fig. 1:
Approach from below (5th string)
the red dot is the root, with the blue dot functioning as the "below" note


fig. 2:
Approach from below (6th string)
this principle can be applied anywhere on any string


The procedure is really easy to apply in Minor chord situations because all you have to do is play the note that’s 2-frets under the root of each Minor chord in your progression to build a really slick sounding ‘approach effect’ for each chord in your minor chord jam. 


Learn the Progression Below:


MAJOR CHORDS:
Major key chords are just as easily covered by playing a ½ step (1 fret) under the Major Root chord and the IV chord but, you’ll need to keep in mind that the V chord of the key will need to be approached by way of 2 frets instead of 1.


So, coming up next, I’m going to cover how to play the opposite idea of this concept, called, “Approach from Above.” But first - here’s a quick promotional message about my popular, “Handouts Collection” eBook offer…


                         ____________________________________________________


I wanted to take a minute to let you know, that if you want to learn even more about scales and theory I have a great offer for you.

With any donation over $5, or any merchandise purchase from my Tee-Spring store, I’ll send you free copies of THREE of my most popular digital handouts.

One is called, “Harmonized Arpeggio Drills” (it’ll train you on developing your diatonic arpeggios).

Another one is my “Barre Chord” Handout which includes a page showing all the key signatures along with a chord progression that applies barre chords.

Plus, you’ll get my Notation Pack! It has 8 pages of important guitar worksheets for notating anything related to; music charts, guitar chord diagrams, and TAB.

As a BONUS, (from my "Over 40 and Still Can't Play a Scale" video), I'll also throw in a breakdown of all of the chords that are diatonic to the "F Major" scale.

As an EXTRA BONUS for my Phrygian Dominant video, I'll also throw in a breakdown featuring all of the chords that are diatonic to the Phrygian Dominant scale.

Just send me an email off of the contact page of CreativeGuitarStudio.com to let me know about either your donation or your Merchandise purchase and I’ll email you those digital handouts within 24 hrs.   

                       ____________________________________________________


Example 2). “Approach from Above” 

When we integrate this idea from the opposite direction called the, “Approach from Above,” we can work this phrasing idea around our chords by coming into the root of each chord through its most appropriate color tone. 


This next example I have for you, is still in the key of “E Minor.”


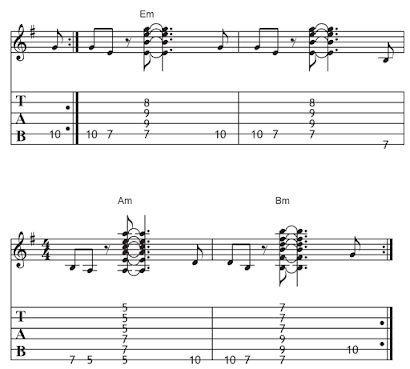
Approach from Above: key of, “E Minor”: 


Perhaps you noticed in my example play through that I didn’t stick with only color tones of a Minor 3rd interval above each chord. Instead, in this example, I took a different direction on the IV-chord of “A Minor” by playing above that chord by way of a whole step (of 2 frets). 


The Minor 3rd, (shown in fig. 3 below), works perfect for the approach from above technique.


fig. 3: 
Minor 3rd w/ approach from above (5th string)
this principle can be applied anywhere on any string


fig. 4: 
Minor 3rd w/ approach from above (6th string)
this principle can be applied anywhere on any string


See, this is always something to consider as you start messing around with the “Approach from Above and Below Concept.” Once you begin getting better at doing this, you can develop other ways of approaching each chord in your progression. Like in this case I approached the “E Minor” from a Minor 3rd, as well as the V-chord of “B Minor,” in the same way. 


But, I changed the approach on that “IV-chord” of “A Minor” by using a 2-fret approach. 


fig. 5: 
Whole-Step approach from above (6th string)
this principle can be applied anywhere on any string


As your playing skills improve you can experiment with additional ideas as well. Here’s an example (the video clip below), of doing this technique with several options in play…


ADVANCED JAM - PERFORMANCE:


CONCLUSION:
The main thing to keep in mind with this technique is that it has very few limitations. And, it can be approached in quite a flexible way musically, because you have choice through the different chord changes in how you’ll be playing the groove of the beat, and how the different qualities of each chord, (by quality I mean whether the chord is; Major, Minor, or perhaps Dominant 7).


Along with all of that, there’s some flexibility with what step of harmony that a guitarist can decide on. You probably noticed in my examples that I changed the interval distance at times (based upon whether I was on the Root chord, or the 4th or on the 5th degree chord of the key’s harmony). 


You don’t really need to comprehend all of the music theory, because this approach is pretty much anchored in the principle of; “If it sounds good, use it, and if it sounds bad, Don’t Use It.” 


All in all this simple technique is a fun and easy concept that will offer you a lot of cool phrasing in almost all of your chord progressions!


___________________________________________________

GET GOOD NOW - JOIN THE MEMBERS AREA

Join Now

Guitar Chords | F Chord | Guitar Notes | G Chord | C Chord | D Chord | Guitar String Notes


Do This EVERY Single Day to Master ANY Scale!

How would you like to learn a unique 2-string guitar scale exercise that will start to retrain both muscle and mental memory for performing the best notes possible when you solo? This exercise will help your note memory to become automatic, and it will help connect the muscles of your hand (along with your mind), so as to build confidence in your fingers when soloing...


The incredible ability that this exercise has to produce melody and have that melody occur very quickly (and accurately), is unlike anything that guitar players who are unfamiliar with this idea will have ever experienced in the past. 


WATCH THE VIDEO:


EXERCISE GOALS:
The goal of this exercise is to promote good note choice and to help stop your note stumbles. The work done on this method will quickly start to fade away the poor notes having them to be instead replaced by confidence and strength for finding the best notes in a more balanced manner.


Wrong notes (that came from years of bad training), will start to dissipate, hand mobility will improve, and the strength of mental recall for the best notes will increase for you without needing to change anything else about your scale knowledge.


THE EXERCISE METHOD:
In this lesson I am going to show you ONE scale exercise that will change the way you practice scales forever! Because, it’s so simple you can do it every single day. 


The exercise is so effective that it will help you apply any scales’ sound in a way that you can immediately start working with the scale (whatever scale it is), to create; licks, melodies, or riffs… whatever you want to get out of the scale, you’ll be able to do it. 


At this point I know you’re probably wondering, what in the world is this scale method. What exercise is this? 


To answer that question you'll need to understand that it has to do with using scales along just two strings in a select region of the fingerboard while targeting the sound of the scale’s tonality with a floating background harmony.


Additionally, (and most importantly), we’ll focus on notes that lead us into the color tones of the scale. Now, all this might sound a little complex, but it really isn’t and if you stick with me through this whole lesson, (we’ll only need about 10 min.), you’ll be able to take any scale and apply it musically in record time using this approach. So… let’s get started…


Example 1):
Two String Major Scale Outline… 

Here’s our first 2-String Scale. It is a “G Major.” Here’s how it sounds, starting from the root note at the 4th-string fifth fret… 


In the video [03:09] I’m sure that the first thing you noticed was how I didn’t play those notes like it was some text book scale exercise, (I played them more like they were a melody), and that’s because when you lay the notes of a scale out across only two guitar strings, you end up with a few duplicate notes… (on the neck diagram, you probably noticed that there were notes which were shown in parenthesis). 


Those notes are duplicates of scale tones that exist between two guitar strings. And, along with that idea, I next want to bring in what’s really one of the most important elements of this exercise - which is using specific notes as what we’ll call – the scales; “target tones.” Let me show you exactly how this works on the neck…


Example 2):
Two String Major Scale Outline (with the Target Tone)… 


Below is an example of our two string “G” Major scale once again. But now, you’ll notice that the 3rd note (from the root), has been colored “Blue.” 


NOTE: When you lean into a color tone, you get a very strong presence of this scales tonality, making it an important note to land on when composing melody lines.


Coming up next, I’m going to cover how to practice creating melody, and targeting the color tones so that your scales start working more musically.


                         ____________________________________________________


I wanted to take a minute to let you know, that if you want to learn even more about scales and theory I have a great offer for you.

With any donation over $5, or any merchandise purchase from my Tee-Spring store, I’ll send you free copies of THREE of my most popular digital handouts.

One is called, “Harmonized Arpeggio Drills” (it’ll train you on developing your diatonic arpeggios).

Another one is my “Barre Chord” Handout which includes a page showing all the key signatures along with a chord progression that applies barre chords.

Plus, you’ll get my Notation Pack! It has 8 pages of important guitar worksheets for notating anything related to; music charts, guitar chord diagrams, and TAB.

As a BONUS, (from my "Over 40 and Still Can't Play a Scale" video), I'll also throw in a breakdown of all of the chords that are diatonic to the "F Major" scale.

As an EXTRA BONUS for my Phrygian Dominant video, I'll also throw in a breakdown featuring all of the chords that are diatonic to the Phrygian Dominant scale.

Just send me an email off of the contact page of CreativeGuitarStudio.com to let me know about either your donation or your Merchandise purchase and I’ll email you those digital handouts within 24 hrs.   

                       ____________________________________________________


Example 3):
Practice Routine for Major Scale (with backing chord)… 

In developing a practice routine for the two-string scale, you’ll get a lot of mileage out of simply using one chord as a backing harmony. For covering this major tonality sound, here’s a nice 2nd inversion “G Major” chord to try: 


You can lay down this chord on a looper pedal (or you can even just use your phone to record it for a minute or two), and - try playing that 2-string scale under it - to work at targeting both into the color tone as well as, try playing into the root note - to work at developing some skill with it. 


Here’s an example play through so that you can better understand what I mean.


SOLOING EXAMPLE PLAY-THROUGH:


IMPORTANT:
In the next release of my Donation and Teespring promotional item the Handouts Collection eBook (Vol. 4 release), I’ll have a brand new section in it that’ll be devoted to this videos topic. 


That new section will include the diagrams and the instruction for all the Major Scale ideas (that we’ve covered here), PLUS there’s going to be a bonus section that will be devoted to showing how to play through this 2 string - scale practicing routine with the additional coverage of using the Minor Scale! 


On top of all that, the Vol. 4 Handouts Collection eBook will contain a new section devoted to the Dorian Mode. The release date of Vol. 4 will be Sept. 05, 2020.


___________________________________________________

GET GOOD NOW - JOIN THE MEMBERS AREA

Join Now

Guitar Chords | F Chord | Guitar Notes | G Chord | C Chord | D Chord | Guitar String Notes


Play These 7 Notes All Afternoon for Endless Fun! (JAZZ, SOUL, R&B)

Are you looking for a path to afternoon guitar fun? Something interesting to jam through that you can also use to build a collection of future songs and riffs from? Well, you're in luck, this post is all about using a simple note combination to create interesting melodic phrases that you can take into countless other directions... 


In this lesson, I'll be running through a series of 7 notes that can work absolutely fantastic for playing and building additional exercises or personalized melodies from. 


Most important, this exercise will help you explore how to develop options from this group of notes so that you can either use it all over the neck for interesting scale exercise, or use it within a piece of music that you're composing.


WATCH THE VIDEO:


ONE COOL EXERCISE:
There are many types of scale and arpeggio exercises for creating melody, but if the ones you're doing are only focusing on playing random notes (that don't offer several added options), then you're not looking at the complete picture. 


This lesson has several added options to take an afternoon of guitar playing into a direction that's both fun and motivating.


In this post we're going to talk about a classic Jazz Soul R and B idea that can make for a great afternoon of fun on the guitar. 


This study is reminiscent of riffs that have occurred in songs by everyone from Ray Charles to Eric Clapton, Duke Ellington, as well as, Led Zeppelin. 


The study is based on a series of 7-notes surrounding a neighboring chord that can produce a ton of options for guitar players when it’s performed in different positions all over the neck. 


Let’s get things started by introducing the framework of how this series of notes sits on the guitar. 


THE UNDERLYING SCALE LAYOUT:

The first note layout that I want to cover with this idea is based on five notes taken from out of the minor scale. We’ll set things up on the guitar from the 7th fret of the 4th string at the note of “A.”


Example 1a). Note names


The tones that we’re starting with are all based from out of a root of “A” at the 4th guitar string. They come together to establish a scale that’s, “Minor.”


Now that you know the note names, start thinking of this series of tones (from the key of “A Minor”), as a geometrical shape on the neck.


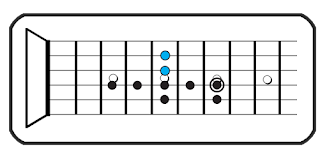
We could use the geometry of this note pattern to start branching out into other positions. The diagram below shows how this note group would look as a scale pattern. Once you see this layout as a pattern, you can move it anywhere along the span of the fingerboard. 


Example 1b). Note Geometry

Move the five notes of the “Minor” Scale all along and around the fingerboard. 


                         ____________________________________________________


I wanted to take a minute to let you know, that if you want to learn even more about scales and theory I have a great offer for you.

With any donation over $5, or any merchandise purchase from my Tee-Spring store, I’ll send you free copies of THREE of my most popular digital handouts.

One is called, “Harmonized Arpeggio Drills” (it’ll train you on developing your diatonic arpeggios).

Another one is my “Barre Chord” Handout which includes a page showing all the key signatures along with a chord progression that applies barre chords.

Plus, you’ll get my Notation Pack! It has 8 pages of important guitar worksheets for notating anything related to; music charts, guitar chord diagrams, and TAB.

As a BONUS, (from my "Over 40 and Still Can't Play a Scale" video), I'll also throw in a breakdown of all of the chords that are diatonic to the "F Major" scale.

As an EXTRA BONUS for my Phrygian Dominant video, I'll also throw in a breakdown featuring all of the chords that are diatonic to the Phrygian Dominant scale.

Just send me an email off of the contact page of CreativeGuitarStudio.com to let me know about either your donation or your Merchandise purchase and I’ll email you those digital handouts within 24 hrs.   

                       ____________________________________________________


EXPANDING ON THE SOUND:

The next step with our scale shape will be converting its sound to behave more like a Jazz, or an R and B idea. What we’re going to do with these notes is add some passing tone options around the set up that we’ve established so far. 


Example 2). 

Adding passing tones to open up our options and create new directions for Jazz, Funk, Soul and R and B musical sounds. 


If we move through the scale tones, (and those passing tones), while basing the layout of the movement upon the shape of a neighboring “Minor” chord, we can start using the chord tones (of that minor chord), around the notes of this scale to create some really cool music. 


Let's begin by learning the shape for this neighboring chord as well as learn more about how all of this can work to our advantage…  


The Neighboring Chord:


Example 4).  

 Adding the first tone of the neighboring chord. 


Example 5). 

Adding the second tone of the neighboring chord.


Example 6).  

 Adding the third tone of the neighboring chord.


Example 7).   

Adding any possible open strings


So the take home message (when it comes to playing around one afternoon with these seven notes – having some fun), is how quickly and easily they can be used to create fun melodic ideas. 


It barely takes any time at all, and you can be working through some great melodic sounds along a number of really interesting chord ideas as well. 


So, try this out. It’s easy to do, and once you start trying this, you’ll find out how cool it can be to use it in your playing. Plus, if you ever need an extra song part (for a song you’re composing), this idea can work great!


___________________________________________________

GET GOOD NOW - JOIN THE MEMBERS AREA

Join Now

Guitar Chords | F Chord | Guitar Notes | G Chord | C Chord | D Chord | Guitar String Notes