Over 40 and Still Don't Know C.A.G.E.D? (DO THIS!)

If you're over the age of 40 and you still have not yet learned about the "C.A.G.E.D. Guitar Method," you really need to study it and learn how it works so that your knowledge of the neck can further expand.


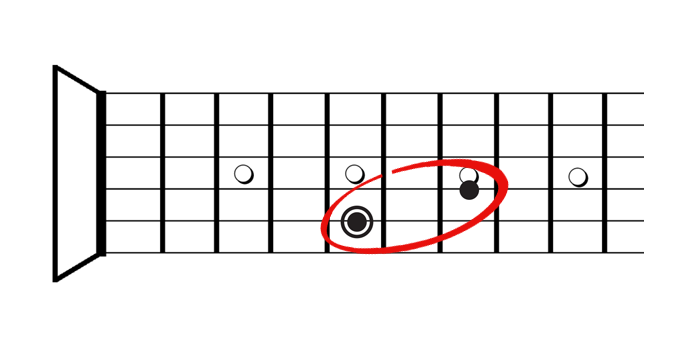
For those of you who are not sure what this guitar method actually is, the "CAGED Method," is a path to learning an octave pattern system based off of the root designed octaves of; "C, A, G, E and D," chords found in the open position of the guitar neck. 


WATCH THE VIDEO:


Some would have you believe that seeing any kind of progress when it comes to learning the guitar after a certain age will be dependent upon resorting to methods like C.A.G.E.D. as a shortcut to more comprehensive development of the fingerboard.


While that is simply not true, this system can still be another learning option that is certainly helpful to most guitar students when it comes to understanding more about how the guitar neck operates for; note names, scales, chords and intervals.


The CAGED Guitar Method: 

If you’re a guitar player who’s over the age of 40 and you’ve never understood what this idea is for guitar that you’ll hear about all over the internet called the “CAGED” Method, then this video is going to be incredibly helpful to you. 


The CAGED Guitar Method (or sometimes called the CAGED Guitar System or Guitar Theory) is a “pattern system” that focuses on the 5 open position chords of “C, A, G, E, and D.” Along with that, the method also deals with each open chords' octaves.


These five chords each have unique fingerboard patterns which already exist within all of them. The fingerboard patterns include octave layouts that are based off of each chords root notes. 


Those root notes each relate to unique shapes for what we call “Octave Patterns” on the guitar fingerboard. Octave Patterns can be very helpful when it comes down to understanding more about; chords, scales and arpeggios, licks, riffs… and pretty much everything that we play!


Grab your guitar along with a piece of fingerboard work-sheet paper and work with me as we start learning all about the; “CAGED Guitar Method.” 


THE FIVE CHORDS OF CAGED:


Example 1).

“C” Major Chord from the Open Position. The Octaves are based upon the 5th and the 2nd guitar strings. 


Once learned, slide the octave pattern laterally calling out the new notes that are associated to each new playing position.


Example 2).
“A” Major Chord from the Open Position. The Octaves are based upon the 5th and the 3rd guitar strings…


Once learned, slide the octave pattern laterally calling out the new notes that are associated to each new playing position.


                        ____________________________________________________
 

I wanted to take a minute to let you know, that if you want to learn even more about scales and theory I have a great offer for you.

With any donation over $5, or any merchandise purchase from my Tee-Spring store, I’ll send you free copies of THREE of my most popular digital handouts.

One is called, “Harmonized Arpeggio Drills” (it’ll train you on developing your diatonic arpeggios).

Another one is my “Barre Chord” Handout which includes a page showing all the key signatures along with a chord progression that applies barre chords.

Plus, you’ll get my Notation Pack! It has 8 pages of important guitar worksheets for notating anything related to; music charts, guitar chord diagrams, and TAB.

As a BONUS, (from my "Over 40 and Still Can't Play a Scale" video), I'll also throw in a breakdown of all of the chords that are diatonic to the "F Major" scale.

As an EXTRA BONUS for my Phrygian Dominant video, I'll also throw in a breakdown featuring all of the chords that are diatonic to the Phrygian Dominant scale.

Just send me an email off of the contact page of CreativeGuitarStudio.com to let me know about either your donation or your Merchandise purchase and I’ll email you those digital handouts within 24 hrs.   

                       ____________________________________________________


Example 3).
“G” Major Chord from the Open Position. The Octaves are based upon the 6th the 3rd and the 1st guitar strings…


Once learned, slide the octave pattern laterally calling out the new notes that are associated to each new playing position.


Example 4).
“E” Major Chord from the Open Position. The Octaves are based upon the 6th the 4th and the 1st guitar strings.


Once learned, slide the octave pattern laterally calling out the new notes that are associated to each new playing position.


Example 5).
“D” Major Chord from the Open Position. The Octaves are based upon the 4th and the 2nd guitar strings.
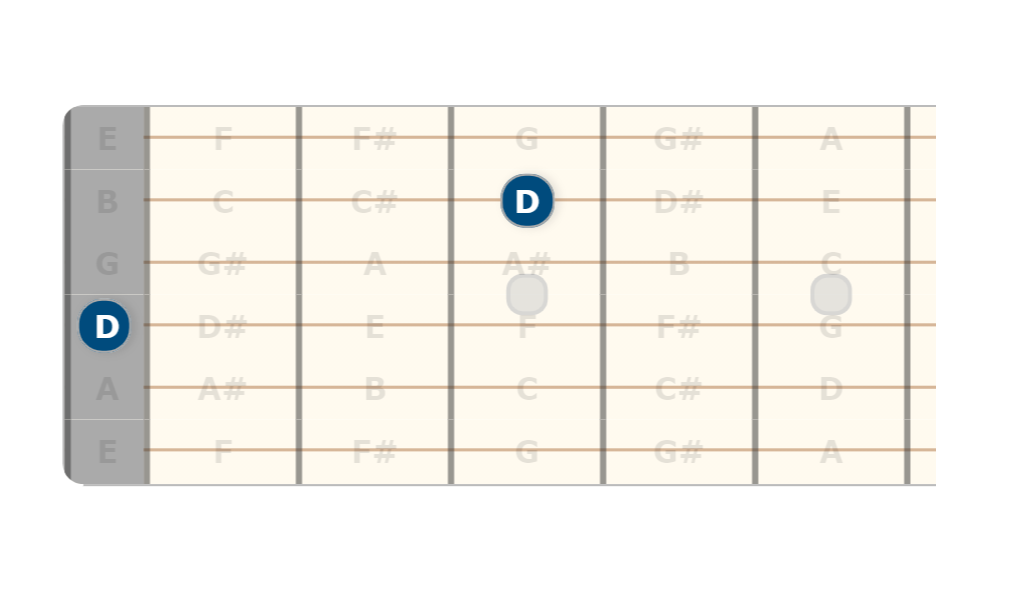


Once learned, slide the octave pattern laterally calling out the new notes that are associated to each new playing position. 


After that, run through the five “full pattern layouts,”by choosing a note and then linking it laterally along the entire fingerboard, (as shown in the diagrams below).


"C" Note Patterns Across the Neck:


"A" Note Patterns Across the Neck:


"G" Note Patterns Across the Neck:


"E" Note Patterns Across the Neck:


"G" Note Patterns Across the Neck:


___________________________________________________

GET GOOD NOW - JOIN THE MEMBERS AREA

Join Now

Guitar Chords | F Chord | Guitar Notes | G Chord | C Chord | D Chord | Guitar String Notes


3 Simple Shapes for Beautiful Chords (ANYONE CAN PLAY!)

If you want to start playing beautiful strong melody lines that can quickly and easily be converted into new killer guitar riffs you are going to love checking out the way that these three simple shapes I demonstrate in this lesson can operate all along the span of the guitar fingerboard...


In this video, I’m going to show you the three best intervals for building up your riffs so that the riffs are more melodic without necessarily having to focus all of your time training on learning every note name, or a lot of music theory.


WATCH THE VIDEO


This lesson focuses on 3 shapes that are not only easy to play but when they’re combined with a few open strings you’ll achieve a beautiful sound that strongly connects all of these shapes together. 


Typically, we refer to these shapes as intervals, because they only have two notes. 


One of these shapes will quite likely be VERY familiar to you, (and depending upon what you’ve studied in the past, it’s quite likely that the other two shapes may also be somewhat familiar as well). 


Let’s get things started by running through each of the three shapes. Then we’ll get into a number of different playing options that you can use with them to start making some music. 


Example 1): The Minor Third

In this first shape we have a pattern that stretches across a whole step between two strings. The interval is referred to as a “Minor 3rd.” 


Example 2): The Major Third

Our second shape is a smaller pattern that applies a half step between two strings. The interval is referred to as a “Major 3rd.” 


Example 2): The Perfect 5th

Our last shape is another pattern a whole step apart between two strings. The interval is referred to as a “Perfect 5th,” however, more commonly it will be referred to as a “Power Chord.” 


                        ____________________________________________________
 

I wanted to take a minute to let you know, that if you want to learn even more about scales and theory I have a great offer for you.

With any donation over $5, or any merchandise purchase from my Tee-Spring store, I’ll send you free copies of THREE of my most popular digital handouts.

One is called, “Harmonized Arpeggio Drills” (it’ll train you on developing your diatonic arpeggios).

Another one is my “Barre Chord” Handout which includes a page showing all the key signatures along with a chord progression that applies barre chords.

Plus, you’ll get my Notation Pack! It has 8 pages of important guitar worksheets for notating anything related to; music charts, guitar chord diagrams, and TAB.

As a BONUS, (from my "Over 40 and Still Can't Play a Scale" video), I'll also throw in a breakdown of all of the chords that are diatonic to the "F Major" scale.

As an EXTRA BONUS for my Phrygian Dominant video, I'll also throw in a breakdown featuring all of the chords that are diatonic to the Phrygian Dominant scale.

Just send me an email off of the contact page of CreativeGuitarStudio.com to let me know about either your donation or your Merchandise purchase and I’ll email you those digital handouts within 24 hrs.   

                       ____________________________________________________


CONCLUSION:
Once you become familiar with these three shapes the fun can really start for you. And, as you’re about to see and hear, it is very easy to apply these shapes (and use them to develop really beautiful sounding music). 


But, the best part is that you won’t need to know any note names on the neck, and you don’t need to understand anything about music theory. 


The shapes can be moved anywhere along the neck and you can even combine them in all sorts of random ways against open strings for some very cool sounding layered effects. 


So, when you understand the fact that these shapes are super easy to play and how these shapes can be applied in any way that you’d like on the neck, you wind up with tons of options for their application in music. 


Let’s wrap up by exploring those options with a melodic example… 


Example 4): Melodic example DEMO (Key of “E Minor”) 


___________________________________________________

GET GOOD NOW - JOIN THE MEMBERS AREA

Join Now

Guitar Chords | F Chord | Guitar Notes | G Chord | C Chord | D Chord | Guitar String Notes

From 0 to 10 Scales in 10 Days (GUARANTEED!)

Want to start doing your first set of scales in just 10 days? Well, if you watch this video and perform the patterns as shown, you’ll be doing at least five scales in no time flat. After that, the remaining five will come along very quickly using the practice ideas outlined in the lesson...


This 10 day, "Zero to 10" scale workout will help you learn five scale patterns centered off of the inner four guitar strings as major shapes. After learning how to organize the starter patterns, you'll learn how to organize the "Relative Tonality" root notes for an additional five Minor scales!


WATCH THE VIDEO:


TEN SCALES IN TEN DAYS:
The key to success with the 10 day timeline will all be based around starting from the perspective of isolating the scale tones from within the four inside guitar strings.


Doing the workout on just those four inside strings will help you progress through the more complex scale designs on the neck right away. Afterward, you'll be able to further increase your scale range out to the 1st and 6th strings along the way, (as you need those tones).


The best part about this lesson is that it’s going to be the last day that you say, “I can’t play any scales.” Because if you follow what I’m going to show you today, I guarantee that you’re going to be able to do at least five scales.


If you put the work in those five will lead you toward knowing how to apply them as ten scales in total - with five for major keys and five for minor keys.


If you dedicate the next ten days to doing this work, you will achieve the fingerboard knowledge on your neck for these scales. 


So, the main thing that’s different here (compared to how you may have tried to study scales in the past), will be in the approach that we’ll apply. 


It’s not going to be the standard text-book approach to learning scales. We’re going to approach this a little bit differently. So, grab your guitar and reach for a piece of fingerboard work-sheet paper.


THE FIVE MAJOR PATTERNS:
The first pattern that we’re going to study will set the stage for how the remainder of the rest of our patterns will function along the span of the neck. 


Our work will only be focused on the inside four guitar strings, with our awareness focused on how the notes of the scale we study can operate onto the outer strings by way of simply learning only two notes located on either the 1st or on the 6th string. 


This works very effectively, because the names of the notes on those two outer strings are the same, making the naming of those notes very easy to understand. So, with all of this in mind, let’s get started with learning our first pattern. 


Example 1).
“D” Major 5th string and 2nd string roots played in the second position of the neck. 


The lower 6th and 1st string notes are available as notes of “G and A.”


Now that you have the basic idea for how this extended scale layout system works – what we’ll do next is study the remaining 4 patterns that you can use to learn the “Major” scale all over the guitar neck. 


At the end of the lesson, I’ll help you understand how to flip all of these patterns over to Minor shapes. But first - here’s a short promotional message about my “Handouts Collection” eBook offer…


                        ____________________________________________________
 

I wanted to take a minute to let you know, that if you want to learn even more about scales and theory I have a great offer for you.

With any donation over $5, or any merchandise purchase from my Tee-Spring store, I’ll send you free copies of THREE of my most popular digital handouts.

One is called, “Harmonized Arpeggio Drills” (it’ll train you on developing your diatonic arpeggios).

Another one is my “Barre Chord” Handout which includes a page showing all the key signatures along with a chord progression that applies barre chords.

Plus, you’ll get my Notation Pack! It has 8 pages of important guitar worksheets for notating anything related to; music charts, guitar chord diagrams, and TAB.

As a BONUS, (from my "Over 40 and Still Can't Play a Scale" video), I'll also throw in a breakdown of all of the chords that are diatonic to the "F Major" scale.

As an EXTRA BONUS for my Phrygian Dominant video, I'll also throw in a breakdown featuring all of the chords that are diatonic to the Phrygian Dominant scale.

Just send me an email off of the contact page of CreativeGuitarStudio.com to let me know about either your donation or your Merchandise purchase and I’ll email you those digital handouts within 24 hrs.   

                       ____________________________________________________


Example 2).
“D” Major 5th string and 3rd string roots played in the fourth position of the neck. Here’s the full pattern…


The lower 6th and 1st string notes are available as notes of “A and B.” 


Example 3).
“D” Major 3rd string root played in the sixth and seventh positions of the neck. Here’s the full pattern…


The lower 6th and 1st string notes are available as notes of “B and C#.” 


Example 4).
“D” Major 4th string root played in the ninth position of the neck. Here’s the full pattern…


The lower 6th and 1st string notes are available as notes of “D and E.” 


Example 5).
“D” Major 4th string to 2nd string roots played in the ninth position of the neck. Here’s the full pattern…


The lower 6th and 1st string notes are available as notes of “E and F#.” 


FIVE MORE MINOR PATTERNS:
Now, that we have five scale patterns for Major, the remaining five for Minor Keys will be very easy to develop. And, how this all works is it’s based upon the fact that minor keys are all the same scale shapes on the neck as Major keys. 


All you need to do is locate the 6th note (from the root of the Major key), and you’ve located your root for Minor. In the key that we just worked on of “D Major,” the 6th note is “B.” So, all we need to do is perform each Major scale we just learned from off of the note “B.” 


By focusing on the 6th note of the Major scale and using that 6th tone as our new root note, we instantly have 5 more Minor scales from the exact same patterns. Let me quickly demonstrate this using that first pattern that we worked on at the start of the lesson…


Example 6).
If we perform the initial "D Major" scale shape off of the note of “B” we automatically produce a scale that establishes Minor tonality.


All you have to do is follow through with those remaining four Major scale shapes and you’ll have all of the rest of the minor scale shapes everywhere across the fingerboard for a grand total of ten shapes (5 major and 5 minor). 


Practice each shape for approx. 10 min. per shape over a period of 10 days and you'll have them all down!


___________________________________________________

GET GOOD NOW - JOIN THE MEMBERS AREA

Join Now

Guitar Chords | F Chord | Guitar Notes | G Chord | C Chord | D Chord | Guitar String Notes